
| Home |
New Arrivals!
|
Company Info
|
Publications
|
Special Features
| Contact Us |
 |
|
|
|
|
|
|
Minolta DiAlta 151 Toner Cartridges
DOC-0287
| Overview |
|
First introduced in April 1999, the Minolta DiAlta 151 engine is an 18ppm, 1200dpi laser printer engine. The cartridge itself is very easy to remanufacture, and with list prices at $210.00 USD per cartridge, a nice profit maker as well. The cartridge is rated for 9,000 pages and is loaded with 300g of toner.
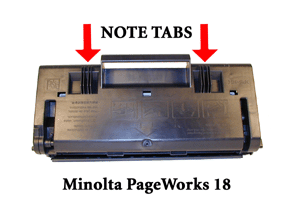
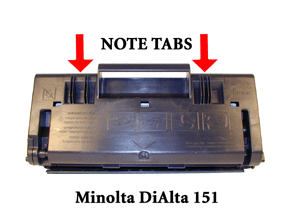
Figures 1 & 2 show the difference between the two Minolta cartridges. The tabs are set so that the cartridges are not interchangeable. I imagine that they do this so that the sales from one division, is completely separate from another. These tabs can be removed so that the cartridges are universal, but it is not easy to cut them out cleanly. I have not seen them, but I imagine that the other printer manufacturers that use this engine have their own version of tabs as well.
FIGURE 1
FIGURE 2The machines that are based on the Minolta DiAlta 151 engine are as follows. The reason that two part numbers are listed for some of the Minolta machines is that since Minolta purchased QMS, they have been changing over the part numbers to the QMS style. The first number is the newer number. The Dialta machines are not manufactured under the Minolta-QMS name so they have retained their own part numbers.
Machine Cartridge Part # Develop D1530 iD Konica 7415 950-704 Konica 7415 MFP 950-704 Lanier 5415 480-0047 Minolta DiAlta 151 4153-102 Minolta DiAlta 151 F 4153-102 PagePro 18 GN/L/LN/N/Plus 171-0398-001, 4153-101 PagePro 4100 E/GN/W 171-0398-001, 4153-101 PagePro 4110 W 171-0398-001, 4153-101 PageWorks 18/L/LN/N/Plus 171-0398-001, 4153-101 NEC NeFax 805 S3538
| Tools Required |
|
- Phillips head screw driver.
- Small Common screwdriver
- Needle Nose pliers
- Spring Hook
- Safety goggles and breathing mask.
- Vacuum approved for toner
| Supplies Required |
|
- 300g DiAlta 151 toner.
- New drum
- New Wiper Blade (Check for availability)
- Sealing Strip (Check for availability)
- Cotton Swabs
- Isopropyl Alcohol
- Kynar Drum Padding Powder
- White Lithium Grease
| Disassembly |
|
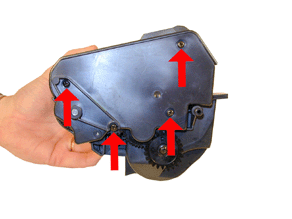
On the gear side of the cartridge, remove the four screws on the end cap. See Figure 3
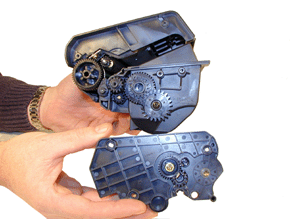
Carefully remove the end cap. Note the location of the gears. See Figures 4 & 5
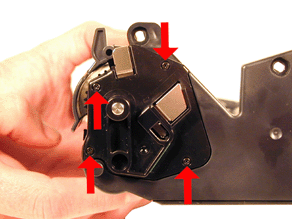
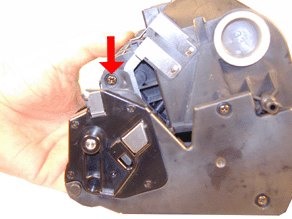
From the fill plug side, remove the three screws. See Figure 6
FIGURE 3
FIGURE 4
FIGURE 5
FIGURE 6
Carefully remove the supply chamber. Be careful not to damage the drum! See Figure 7
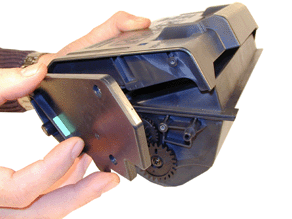
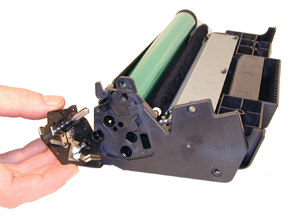
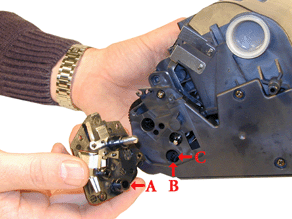
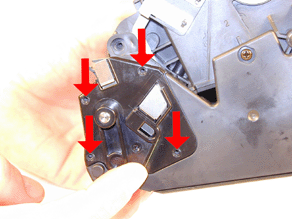
On the fill plug side end cap there is a second smaller end cap, or contact plate. This plate is held in with four very small screws. Use a jewelers Phillips head screwdriver to remove them. See Figure 8
FIGURE 7
FIGURE 8
Remove the contact plate. A gear may come loose. Be sure not to lose it. (It may stick to the inside of the plate). See Figure 9
Remove the large end cap, and drum cover. See Figure 10
FIGURE 9
FIGURE 10
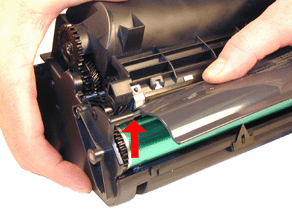
The PCR will be left sitting next to the drum. Remove the drum and PCR, place aside. Do not touch the PCR with your hands, as the oil normally present in your skin will contaminate the roller. See Figure 11
The PCR in these cartridges is a felt type that should only be cleaned with clean, dry compressed air. Do not use any chemicals on it, as there is a conductive coating on the felt that will be removed. The PCR’s in these cartridges will typically last for up to two cycles. New replacement PCR’s will probably never be available.
Remove the wiper blade and two screws. Leave the two small metal plates on the wiper blade. Believe it or not they are the contacts for the PCR! When new wiper blades become available, these contacts should be swapped over. See Figures 12 & 13
Clean out the waste chamber. Note that there is an auger that pushes the waste toner back into the supply chamber. Make sure that the auger turns freely, and that the drive gear on the outside of the hopper does not get lost.
Coat the wiper blade with your preferred lubricant, and install in the cartridge. Install the two screws. Align the blade with the three tabs, and drop in place. See Figure 14
FIGURE 11
FIGURE 12
FIGURE 13
FIGURE 14
Clean the PCR contacts with a cotton swab and alcohol. See Figure 15
Remove the fill plug from the supply chamber. Dump out any remaining toner, and vacuum clean. See Figure 16
FIGURE 15
FIGURE 16
Although at this stage it is tempting to just fill the supply, and close it up, it is very important that this not be done. The Doctor Blade in these cartridges tends to get a buildup on it that will interfere with toner distribution on the developer roller, causing streaking down the page. If not cleaned, this can happen in as soon as 1000 pages. This blade needs to be cleaned every cycle.
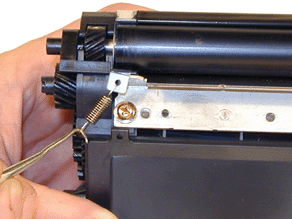
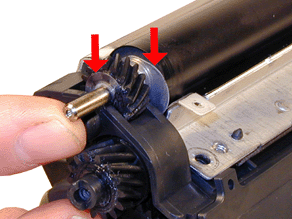
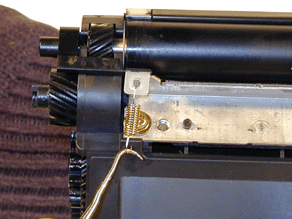
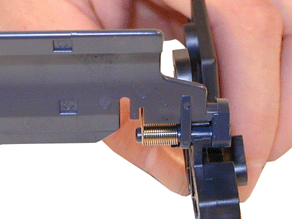
Remove the two small springs on the developer roller tensioners with the spring hook. See Figure 17.
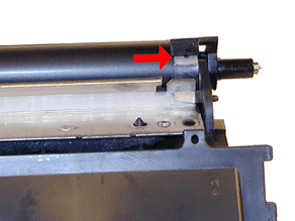
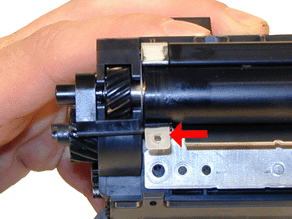
Turn both of the developer roller clips up so that they unlock, and remove. Both clips have been colorized for ease of identification. See Figures 18 & 19
Remove the developer roller. Be careful when handling the roller as it has a sleeve around it that is easily damaged. We have found it best to handle the roller by the metal shaft only. Do not touch the sleeve with your skin. See Figure 20.
FIGURE 17
FIGURE 18
FIGURE 19
FIGURE 20
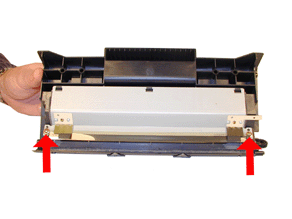
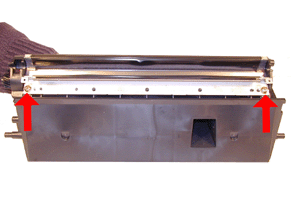
Remove the two screws from the doctor blade. See Figure 21.
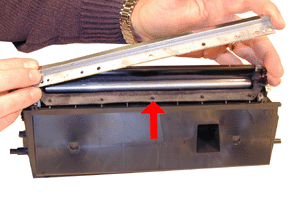
Remove the doctor blade being very careful not to damage the seal foam. It may stick to the blade as it is removed. Separate the foam from the blade, and remove the blade. See Figure 22.
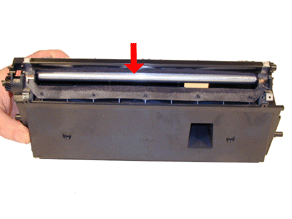
Clean out all the remaining toner from the hopper. Be especially careful to clean any toner residue off the metal feed roller. It is also important not to damage the clear plastic tensioners on either side of the hopper. See Figures 23 & 24
FIGURE 21
FIGURE 22
FIGURE 23
FIGURE 24
Place the doctor blade foam back in its proper position. See Figure 25
Clean the doctor blade with Acetone followed by alcohol. Make sure it is dry, and install in the cartridge. Make sure that the Dr. blade contact is behind the blade, and that the tensioners are on top. See Figures 26 & 27
These cartridges come new with out seals. The supply hopper is tight enough not to leak (much). Actually they hold up pretty good. Just make sure they are packed good if shipping them.
Install the developer roller. Make sure that the spacers on each side of the roller are straight, and in their proper place. See Figure 28
FIGURE 25
FIGURE 26
FIGURE 27
FIGURE 28
Install both developer roller clips, larger on the gear side, smaller on the fill plug side. Lock both clips in place. Make sure that the clear tensioner strips are under the clip tabs. See Figures 29, 30, & 31.
Install the two small springs on the tensioners. Make sure you keep the hook side of the spring down! See Figure 32
FIGURE 29
FIGURE 30
FIGURE 31
FIGURE 32
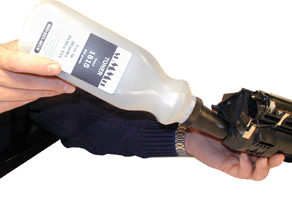
Fill with 300g 151 toner. See Figure 33
Replace the fill plug, check for leaks. See Figure 34
Check the geared end cap to see if the grease is contaminated with toner. If it is, clean it all off with alcohol, and replace it with white lithium grease. Be sure to try and put the same amount back that was removed. See Figure 35
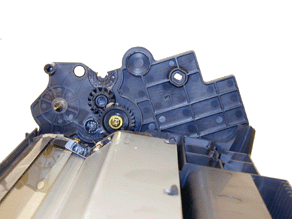
Install the right side end cap (Has two gears mounted on it), onto the waste hopper. See Figure 36
FIGURE 33
FIGURE 34
FIGURE 35
FIGURE 36
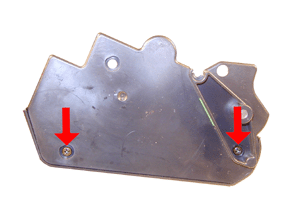
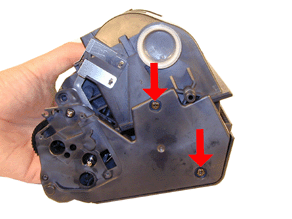
Install two of the screws as indicated. See Figure 37
Install the cleaned (Blown off) PCR into the end cap. The thick shaft side fits into the end cap. Do not touch the PCR with your hands, as the oil normally present in your skin will contaminate the roller. Make sure that the gears are aligned. See Figure 38
FIGURE 37
FIGURE 38
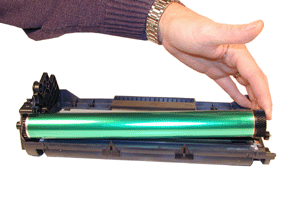
Install the drum large gear side to the right. See Figure 39
If the OEM drum is damaged, new drums are available with out gears, the gears must be swapped out.
Install the toner hopper into the end cap. It should just snap in place. Make sure that the cut gear shaft fits into the hopper properly. You may have to turn the gears slightly to align them. Install the two remaining screws. See Figures 40 & 41
Remove the drum cover from the left end cap. Turn it up so that it can be gently pried from its holder. See Figure 42
FIGURE 39
FIGURE 40
FIGURE 41
FIGURE 42
Place the loose gear from the end cap by the PCR gear. See Figure 43
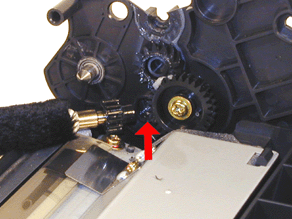
Install the end cap onto the cartridge, install the two screws as shown. See Figure 44
This is tricky, the shaft from the contact plate has to go through the end cap and the loose gear. The metal drum axle must fit into the drum and must also line up with the two hoppers. Don’t force it; keep playing with it until it fits. See Figure 45
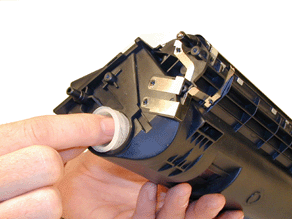
Install the four small screws in the contact plate. See Figure 46
FIGURE 43
FIGURE 44
FIGURE 45
FIGURE 46
Install the three remaining large screws. See Figure 47
Install the drum cover back on to the end cap. Make sure that the spring is set properly, and that the end of the cover fits into it’s slot on the opposite side. See Figures 48 & 49.
The drum does not drive the toner supply section of the cartridge, only the waste section. The toner supply is driven separately by the large gear on the bottom of the toner hopper. See Figure 50.
FIGURE 47
FIGURE 48
FIGURE 49
FIGURE 50
So if you normally spin the drum a few times to ensure that all the gears are aligned, and that the drum & wiper blade are lubricated, don’t panic! Only the drum is supposed to turn!
The cartridge is finished!
This last part of re-assembling the cartridge is one of the worst I have seen. It must be a nightmare for the production line when they build these! As the commercials say; “From the minds of Minolta”!
| Running Test Pages |
|
The following is for the PageWorks/PagePro versions of these machines. (The most popular). The DiAlta fax machines have a series of reports that can be used to test the cartridge. All are accessible from the control panel.
Make sure that the READY light is on. Briefly press the PANEL BUTTON, a configuration page will print
The test prints available through the printer driver are: (the printer must be hooked up to a computer, and the correct driver installed.)
DEMO PAGE
Configuration Page
PCL FONT LIST
PS FONT LIST
| Machine Error Codes |
|
The following is for the PageWorks/PagePro versions of these machines. (The most popular). The DiAlta versions have a display panel.
These machines use lights instead of a display panel. The Ready Light is Green, Paper Light is Amber, and the Error light is Red.
Some of the more common light sequences are as follows:
Ready Paper Error Printer Status (Green) (Amber) (Red) ON OFF ON TONER LOW ON BLINKING ON TONER OUT OFF OFF ON COVER OPEN OFF Blinking OFF PAPER MISFEED ON OFF BLINKING FUSER ERROR ON ON BLINKING LASER ERROR BLINKING OFF BLINKING SCANNER ERROR BLINKING ON BLINKING FAN ERROR
© 2003 Summit Laser Products, Inc. Any attempt to reproduce any part of these instructions without the written consent of Summit Laser Products, Inc is prohibited. All registered trademarks are the property of their respective owners.
Contact Summit Laser Products
Toll Free Orders: 800-221-3516
Toll Free Fax: 888-791-9188International Orders: +1-631-218-8376
International Fax: +1-631-218-3285Domestic Sales E-mail: sales@summitlaser.com
International Sales E-mail: export@summitlaser.comTechnical Support: +1-631-218-8376
Technical Support E-Mail: tech@summitlaser.comMail: Summit Laser Products
95 Orville Drive, Bohemia, New York 11716 - USAPlease report any broken links to: webmaster@summitlaser.com
Authorized Summit Laser Distributors
| Ukraine
Distributor SINT Company order@sint-master.com
|
All products on this web site, unless stated otherwise, are independently produced and distributed by Summit Laser, and not by the individual manufacturers of the copiers and printers referenced herein. Use of trade styles and trademarks of the individual manufacturers of the copiers and printers referenced herein are for descriptive purposes only and are not intended to imply any form of endorsement by the individual manufacturers of the refill or supply products offered herein. As such, all items in this catalog are deemed to be construed as “for use in,” “for use with or compatible with,” whether or not stated for each individual item as opposed to the group of items.

