

| Home |
New Arrivals!
|
Company Info
|
Publications
|
Special Features
| Contact Us |
 |
|
|
|
|
|
|

Panasonic KX-FL510, KX-FA76, KX-FA77 Toner Cartridges
DOC-0298
| Overview |
|
First introduced in December 2000 the Panasonic KX-FL501 engine is rated for 10ppm at 600dpi. The machines based on the FL501 engine have become very popular low cost multi-function machines. The style of toner and drum units do not look like a “normal” Panasonic package. In fact they look an awful lot like an Okidata. Although Panasonic seems to have taken a page from Okidata, this is a Panasonic engine. The engine itself is laser, not LED (Okidata would be LED).
The drum unit has a fairly low yield as it is rated for only 6,000 pages. It is fairly inexpensive at $99.00 each, but when combined with the toner rated for 2,000 pages listing for $40.00 each, the cost per page is fairly high. (0.04 cents per page, double what some of the newer HP machines cost).
Although at the time of this writing no new parts are available for the drum unit, new drums and developer rollers are being developed. Toner is available in both new generic kits, as well as in bottles. If cared for properly, the OEM drum will last another cycle.
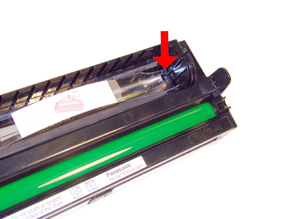
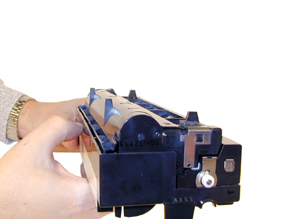
New OEM drum cartridges come with a clear plastic strip that helps seal off the toner hopper. (See Figure 1) New cartridges have toner in the hopper, probably left over from factory testing, this strip places just enough pressure on the hopper cover to prevent toner from leaking out.
FIGURE 1As with most of the Okidata systems, once you rebuild the OPC cartridge, and place in a new toner tube, the OPC cartridge will draw in most of the toner into its feed section. This may cause the "Toner Low" message to appear as sooner than normal. This is all stated in the user’s printer manual, and is considered normal for new OEM as well as rebuilt cartridges.
One major point to check before you start is to check the four legs that the cartridge stands on. If any of them are broken, the cartridge should be kept for parts only. With one leg broken, the cartridge will tend to move during printing and you will at best get uneven prints, at worst a paper jam. See the troubleshooting chart for more information and pictures of the legs.
It should also be noted that the gears and even the surface edge of the drum have a fair amount of grease on them. Be careful when picking up these parts so that grease does not get all over places where it should not be. (I learned that the hard way!)
The Panasonic machines based on the KX-FL501 engine are the:
KX-FL501
KX-FL521
KX-FLB751
KX-FLM551
There are currently three different part numbers from Panasonic on these drum units. The KX-FA77D, KX-FA78A, and the KX-FA78X. These three part numbers replaced the KX-FA77, KX-FA77A, and the KX-FA77X. These first cartridges apparently printed too dark, and Panasonic had complaints about the yield. The newer cartridges print somewhat lighter.
Along with the three part numbers for the drum units, there are also three part numbers for the toner tubes. They are the KX-FA76, KX-FA76A, and the KX-FA78X
Cartridge troubleshooting will be covered at the end of this article.
| Supplies Required |
|
- Long Life OPC Drum (When Available)
- Cotton Swabs
- Isopropyl Alcohol
- DPP Drum Padding Powder
- White lithium Grease
| Tools Required |
|
- Phillips head screw driver.
- Small Common screw driver
- Safety goggles and breathing mask
- Vacuum approved for toner
- Spring Hook
| DIsassembly |
|
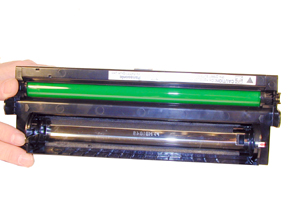
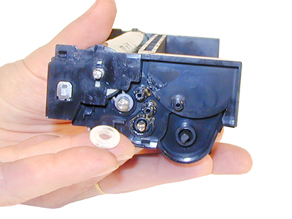
Vacuum the outside of the cartridge thoroughly, especially the exposed Toner Hopper. If the toner tube is still installed, remove it now. See Figure 2
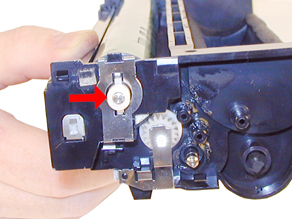
With the small common screwdriver, release the two plastic tabs located on each end of the cartridge. See Figure 3.
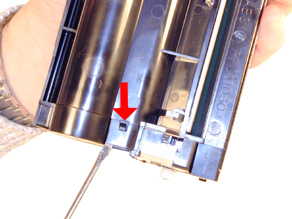
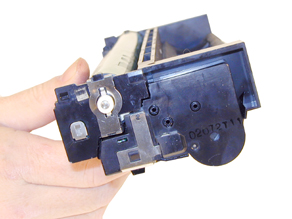
Release the three plastic tabs located on the back edge of the toner hopper. The easiest way to do this is to slide the edge of the screwdriver into the edge of the seam, and work it along until all three tabs are released. See Figure 4.
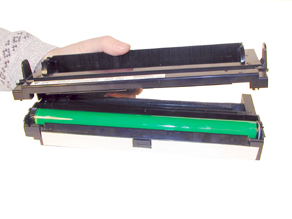
Remove the top cover. See Figure 5
FIGURE 2
FIGURE 3
FIGURE 4
FIGURE 5
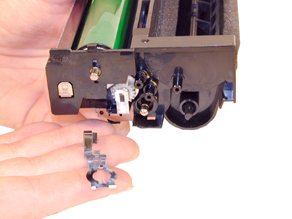
On the non-gear side of the cartridge, release the bottom tab on the end cap. Remove the end cap. See Figure 6.
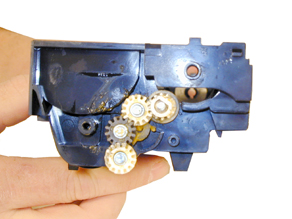
Remove the five gears to prevent them from falling off and being lost. See Figure 7.
Pry up on the bottom of the metal contact located on the side of the drum, remove the white plastic drum spacer. See Figures 8 & 9
FIGURE 6
FIGURE 7
FIGURE 8
FIGURE 9
With the pair of wire cutters, carefully pry out the drum axle rod. See Figure 10
Remove the drum. Be careful not to loose the metal ring that fits over the drum gear hub. See Figure 11
The cleaning roller is now exposed. Lightly vacuum any toner off the roller. Be careful to make sure that the humidity in the cleaning room is at least 30%RH. Levels lower than this will cause a static buildup on the roller that will be very hard to remove. If the humidity level is lower than 30%RH, leave the roller alone for now. Cleaning the roller now prevents toner from getting all over, but is not necessary to do at this point. See Figure 12
Remove the remaining clip and gear. See Figure 13
FIGURE 10
FIGURE 11
FIGURE 12
FIGURE 13
Remove the white plastic round spacer. See Figure 14
Remove the white locking hub. See Figure 15
On the opposite side of the cartridge, remove the screw and end cap. See Figure 16
NOTE: This side of the cartridge also has a set of gears. These gears should also be removed to prevent them from being lost. Just make sure that you keep them separate from the first group to prevent problems later. See Figure 17
FIGURE 14
FIGURE 15
FIGURE 16
FIGURE 17
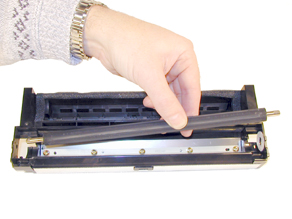
Remove the developer roller, the white round spacer, locking spacer, and the flat washer. See Figures 18 & 19
If the developer roller has a buildup of toner that will not come off, try wiping the roller off with a dry lint free cloth first. If the buildup remains, clean it with a good rubber roller cleaner that does not leave a residue.
Remove the five screws on the Dr. Blade. Note that the two screws at each end of the blade are self tapping, and that the three middle screws have machine threads. See Figure 20
Clean the Dr. Blade with alcohol, and a lint free cotton swab.
Re-install the Dr. Blade and five screws. Make sure the different types of screws are in their proper locations. See Figure 21
FIGURE 18
FIGURE 19
FIGURE 20
FIGURE 21
At this point, the foam cleaning roller should be cleaned. Even if the roller was vacuumed before, it should be cleaned now. The best way to do this is with clean compressed air. The cleaning roller takes the place of the wiper blade. It has an electrical charge placed on that attracts the excess toner to it. Removing and replacing the roller is very difficult. For this reason, we recommend that the roller be cleaned while in the cartridge.
Re-install the developer roller, long axle side to the drum gear side. Make sure that the white bushing remains on the cartridge, and that it is locked in place. See Figure 22
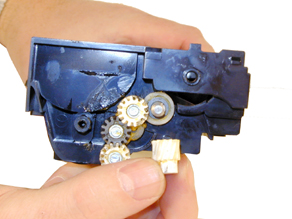
Install the four gears on the drum gear side of the cartridge. Make sure that the long keyed gear is seated properly. See Figure 23
Install the end cap and screw. See Figure 24
Install the white locking hub, round white plastic hub, and white gear onto the developer roller shaft. See Figure 25
FIGURE 22
FIGURE 23
FIGURE 24
FIGURE 25
Install the metal clip over the developer roller shaft. Make sure that the small tab on the clip fits behind the Dr. Blade. See Figure 26
Slide the metal drum axle through the drum gear, and push it through until the end of the shaft is flush with the drum gear hub. See Figure 27
Install the drum hub side first, tap the axle through until the opposite side of the axle fits through the side wall of the cartridge. Drop the drum in place and push the axle rod back so that it is even on both sides. See Figures 28 & 29
FIGURE 26
FIGURE 27
FIGURE 28
FIGURE 29
Install the metal clip over the drum axle. See Figure 30
Install the white plastic locking hub onto the drum axle, and into the metal clip. See Figure 31
Install the five gears onto the cartridge. See Figure 32
Install the end cap. Make sure it snaps into place. See Figure 33
FIGURE 30
FIGURE 31
FIGURE 32
FIGURE 33
Install the top cover. Make sure that all the tabs are locked in place. See Figure 34
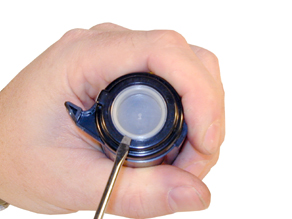
The toner cartridge can be refilled by removing the fill plug on the end of the cartridge, vacuum the tube clean and refill. See Figure 35
FIGURE 34
FIGURE 35The drum units in these cartridges do not need to be reset.


| Trouble SHooting |
|
A very common problem with drum cartridges, is a band of toner
across the top of the page, usually 1" thick. The band can be either solid black, or shades of gray. This problem has been known to occur in new OEM cartridges as well as rebuilt cartridges. The cause of this problem is a bad contact in the drum ground circuit. This is usually located at (but not limited to) the contact gear in the OPC Drum where it meets the metal drum axle. Depending on the severity, sometimes all that will print is the solid black band, or is less serious cases, a gray band will show across the printed page and some text will also print.
Another common problem is a build up of toner on the cleaning roller or the developer roller. In either case there will be dark black toner smears on the page. These smears can show up as being either vertical or horizontal. The only way to fix this problem is to take the cartridge apart and clean these items.
If you are experiencing uneven print that does not seem to follow any sort of pattern, one of the cartridge legs are probably broken. If this is the case the cartridge should not be used, save it for parts only. There is no reliable way to fix a broken leg. See Figure 36.
FIGURE 36Another symptom of a broken leg is paper jams at the base of the cartridge. As stated above, whenever a drum cartridge has a broken leg, it should not be used.
Machine error codes are not listed because they are all shown on the display in English (No number codes). All the messages are self explanatory
First introduced in December 2000 the Panasonic KX-FL501 engine is rated for 10ppm at 600dpi. The machines based on the FL501 engine have become very popular low cost multi-function machines. The style of toner and drum units do not look like a “normal” Panasonic package. In fact they look an awful lot like an Okidata. Although Panasonic seems to have taken a page from Okidata, this is a Panasonic engine. The engine itself is laser, not LED (Okidata would be LED).
The drum unit has a fairly low yield as it is rated for only 6,000 pages. It is fairly inexpensive at $99.00 each, but when combined with the toner rated for 2,000 pages listing for $40.00 each, the cost per page is fairly high. (0.04 cents per page, double what some of the newer HP machines cost).
Although at the time of this writing no new parts are available for the drum unit, new drums and developer rollers are being developed. Toner is available in both new generic kits, as well as in bottles. If cared for properly, the OEM drum will last another cycle.
New OEM drum cartridges come with a clear plastic strip that helps seal off the toner hopper. (See Figure 1) New cartridges have toner in the hopper, probably left over from factory testing, this strip places just enough pressure on the hopper cover to prevent toner from leaking out.
As with most of the Okidata systems, once you rebuild the OPC cartridge, and place in a new toner tube, the OPC cartridge will draw in most of the toner into its feed section. This may cause the "Toner Low" message to appear as sooner than normal. This is all stated in the user’s printer manual, and is considered normal for new OEM as well as rebuilt cartridges.
One major point to check before you start is to check the four legs that the cartridge stands on. If any of them are broken, the cartridge should be kept for parts only. With one leg broken, the cartridge will tend to move during printing and you will at best get uneven prints, at worst a paper jam. See the troubleshooting chart for more information and pictures of the legs.
It should also be noted that the gears and even the surface edge of the drum have a fair amount of grease on them. Be careful when picking up these parts so that grease does not get all over places where it should not be. (I learned that the hard way!)
© 2003 Summit Laser Products, Inc. Any attempt to reproduce any part of these instructions without the written consent of Summit Laser Products, Inc is prohibited. All registered trademarks are the property of their respective owners.
![]()
Contact Summit Laser Products
Toll Free Orders: 800-221-3516
Toll Free Fax: 888-791-9188International Orders: +1-631-218-8376
International Fax: +1-631-218-3285Domestic Sales E-mail: sales@summitlaser.com
International Sales E-mail: export@summitlaser.comTechnical Support: +1-631-218-8376
Technical Support E-Mail: tech@summitlaser.comMail: Summit Laser Products
95 Orville Drive, Bohemia, New York 11716 - USAPlease report any broken links to: webmaster@summitlaser.com
Authorized Summit Laser Distributors
| Ukraine
Distributor SINT Company order@sint-master.com
|
All products on this web site, unless stated otherwise, are independently produced and distributed by Summit Laser, and not by the individual manufacturers of the copiers and printers referenced herein. Use of trade styles and trademarks of the individual manufacturers of the copiers and printers referenced herein are for descriptive purposes only and are not intended to imply any form of endorsement by the individual manufacturers of the refill or supply products offered herein. As such, all items in this catalog are deemed to be construed as “for use in,” “for use with or compatible with,” whether or not stated for each individual item as opposed to the group of items.