Remanufacturing
the Xerox 4525 Toner Cartridge
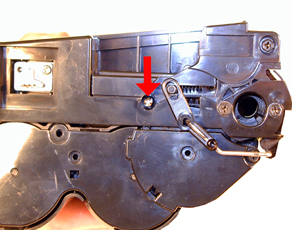
0317
First released in April 2001, the Xerox 4525
is based on a 45 ppm 1200 Dpi engine. While it looks like an N24
cartridge there are differences, but most importantly the toner is
different. The higher speed of these machines calls for a toner that
melts at a different temperature than the N24. Most of the other
parts used in the cartridge are standard N24, but the toner is not.
Machines based on the Xerox 4525 engine are
as follows:
Lexmark W820, 820DN, 820E, 820N Cartridge # 12B0090
IBM InfoPrint 1145, 1145DN, 1145N Cartridge # 28P1882
Xerox DocuPrint N4525, 4525BX, 4525CN, 4525FM Cartridge # 113R00195
All three cartridges are rated for 30,000
pages at 5% coverage.
Acom also makes a MICR Enhanced version of the Xerox 4525, but as of
now, no toner or chips are available for it.
These cartridges all use N24 type chips that
must be replaced each cycle. Each cartridge has its own chip. Make
sure you know which machine your customer has before installing the
chip. The cartridge will not print if the wrong chip is installed.
Unlike the N24 cartridges, these do not have
all the variations to worry about. They are very simple to do, work
great and with a list price of $372.00, very profitable!
Running test prints as well as cartridge
troubleshooting will be covered at the end of this article.
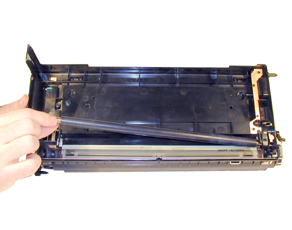
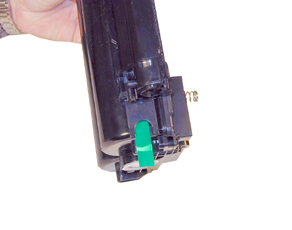
1) Vacuum the exterior of the cartridge.
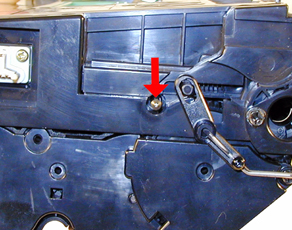
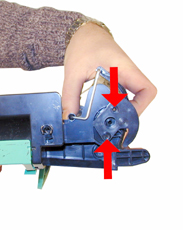
2) On each side of the cartridge there is
a large metal pin.
3) Carefully pull these pins out using
either a pair of needle nose pliers or wire cutters. See Figures
1 & 2
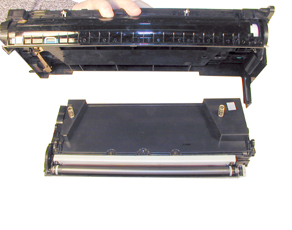
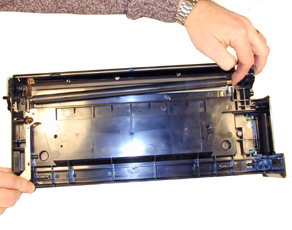
4) Remove the Waste Chamber and put the
toner hopper aside. See Figure 3
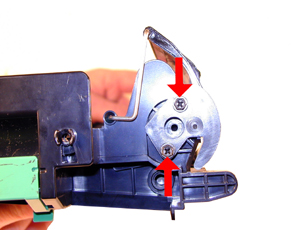
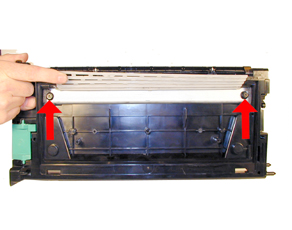
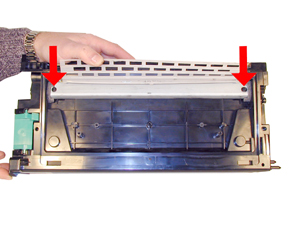
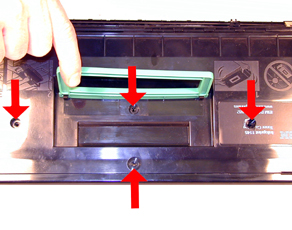
5) Remove the two screws on each side of
the drum axle plates, remove the Plates. See Figures 4 & 5
|
|
Figure 1 |
Figure 2 |
|
|
Figure 3 |
Figure 4 |
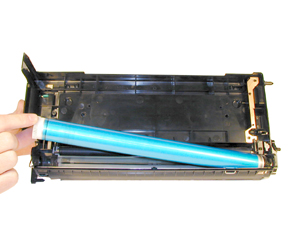
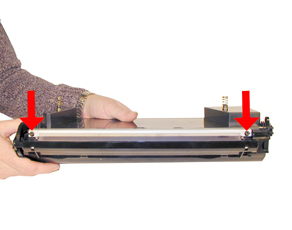
6) Remove the Drum from the cartridge. See
Figure 6
7) Remove the Primary Charge Roller (PCR).
Clean with your preferred PCR cleaner. See Figure 7
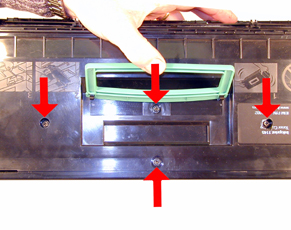
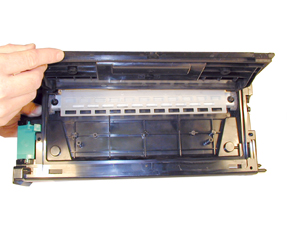
8) Remove the top cover of the Waste
Chamber by removing the 4 screws. One is hidden under the label,
and one is under the handle. See Figure 8
|
|
Figure 5 |
Figure 6 |
|
|
Figure 7 |
Figure 8 |
9) Remove the tape seal from the right
side. Pry the cover up from the bottom edge. See Figures 9 & 10
10) Clean all the toner out of the waste
chamber.
NOTE: Be very careful not to bend
or otherwise damage the small thin recovery blade located next to
the Wiper Blade when vacuuming. If this blade is bent down lower
than the height of the wiper blade, toner will accumulate on top
of the blade and spill into the printer. If the blade does get
bent, it should be replaced.
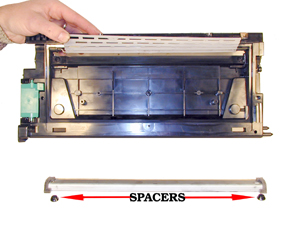
11) Remove the Wiper Blade (2 screws and
spacers, lift up and out). DO NOT lose the spacers! This blade has
a tight fit, work it loose form both edges and lift out. See
Figures 11 & 12
|
|
Figure 9 |
Figure 10 |
|
|
Figure 11 |
Figure 12 |
12) Coat the NEW wiper blade with your
preferred lubricant and install. See Figure 13
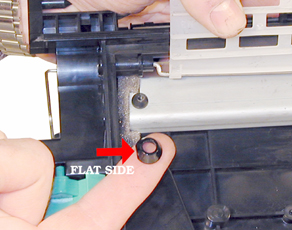
13) Replace the two screws and spacers.
Make sure the flat side of the spacers is facing the foam. That
way the foam will not be pinched by the spacer possibly causing a
leak. See Figures 14 & 15
14) Install the top cover front edge
first. Press down so the back tabs lock in place, install the four
screws, and the tape seal on the right side. See Figures 16, 17 &
18
|
|
Figure 13 |
Figure 14 |
|
|
Figure 15 |
Figure 16 |
|
|
Figure 17 |
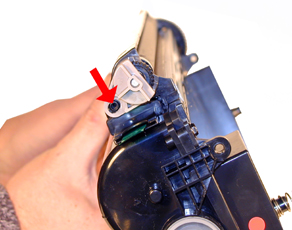
15) Install the cleaned PCR. See Figure 19
16) Install the white gear side of the
drum to the white PCR holder side of the cartridge. See Figure 20
17) Install the two drum end caps, and
screws. See Figures 21 & 22
|
|
Figure 18 |
Figure 19 |
|
|
Figure 20 |
Figure 21 |
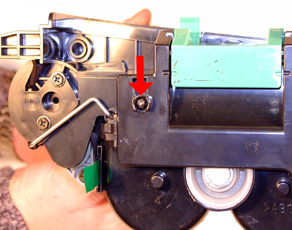
18) Remove the fill plug, and dump any
remaining toner out.
19) On the small drive gear side of the
supply chamber, remove the screw, and Magnetic roller end cap. See
Figure 23
20) Carefully remove the magnetic roller,
vacuum clean and place aside. See Figure 24
21) Remove the two screws and DR blade.
See Figure 25
|
|
Figure 22 |
Figure 23 |
|
|
|
Figure 24 |
Figure 25 |
22) Vacuum the Toner hopper thoroughly.
23) Install the seal so that the tail is
on the small drive gear side. Make sure the tail fits into its
slot, and comes out through the seal channel. See Figures 26 & 27
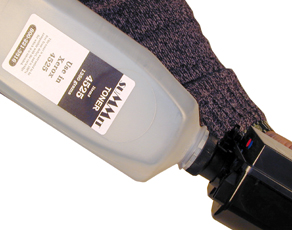
24) Fill the hopper with 1350g of
dedicated W820 toner. As explained in the beginning of this
article, normal N24 toner will not work in these cartridges due to
the higher printing speed of the machines. Check for leaks. See
Figure 28
25) Replace the DR blade and two screws.
See Figure 29
|
|
Figure 26 |
Figure 27 |
|
|
|
Figure 28 |
Figure 29 |
26) Turn the bushing on the magnetic
roller assembly so that the curved side is facing up. Pull it away
from the roller slightly, and install the entire assembly into the
hopper. Press the bushing in so that it is seated properly, and
press the drive gear back on the keyed shaft. See Figures 30, 31
& 32
27) Install the end cap and screw. Note
that both the end cap and Magnet shaft are keyed. Make sure that
the roller turns freely. See Figure 33
28) Re-assemble the cartridge by placing
the two halves together. Make sure that the springs fit into their
respective holes. See Figure 34
29) Install the two large hinge pins into
each side. See Figures 35 & 36
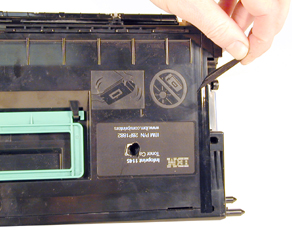
30) Replace the chip with the correct chip
for your cartridge. The IBM 1145, Lexmark W820, and Xerox 4525 all
use different chips. See Figure 37
|

|

|
Figure 30 |
Figure 31 |
|

|
|
Figure 32 |
Figure 33 |
|

|
|
Figure 34 |
Figure 35 |
|
|

|
Figure 36 |
Figure 37 |
Make sure the READY light is on.
Press the MENU button until Utilities
MENU appears on the display.
Press SELECT
Press the MENU button until either PRINT
FONTS or PRINT MENUS appears on the display. Choose the page you
want to print, and Press SELECT.
The chosen page will print out.
There are no strange or unique issues that
we have seen with these cartridges. Normal cartridge problems along
with the repetitive defect rate are listed below
Primary Charge Roller (PCR); The
primary charge roller if dirty will show on the test print as
vertical gray streaks down the page, or as a gray background
throughout the page. If there is any physical damage, it will repeat
at intervals of 44mm.
A Dirty PCR Connection will result in
dark black horizontal bars across the page, or as shading throughout
the page.
A Scratched Drum will show up as a
very thin, perfectly straight line that runs from the top to the
bottom of the test page.
A Chipped Drum will result in a dot
or series of dots that repeat at 95mm intervals
A Damaged Magnet Roller Sleeve will
either leave a mark or a blank spot (depending on the type of
damage) at intervals of 56mm.
A Worn Magnetic Roller Sleeve will
cause light prints. (You can normally see the silver through the
black coating on a worn mag.)
A Light Damaged Drum will show up as
a shaded area on the test print that should be white. Again
this will repeat at intervals of 95mm.
A Bad Wiper Blade will result in
vertical gray lines down the page, or as shading across the entire
page. In either case there will be a film of toner on the drum
surface.
© 2003-2004 Summit Laser Products, Inc.
Any attempt to reproduce any part of these instructions without the written
consent of Summit Laser Products, Inc is prohibited. All registered trademarks
are the property of their respective owners.

|