

| Home |
New Arrivals!
|
Company Info
|
Publications
|
Special Features
| Contact Us |
 |
|
|
|
|
|
|
|

Brother HL-7050 DR-700
OPC Cartridges
DOC-0326
| Overview | |
These instructions cover the recycling of the Brother DR-700 OPC cartridge used in laser printers using the Brother HL-7050 Engine. The DR-700 drum cartridge is used in conjunction with the TN-700 toner cartridges.
First introduced in November of 2002, these laser printers are loosely based on the popular HL-1240 (460) engine. The HL-7050 is a 30ppm, 1200 Dpi engine with a monthly duty cycle of 150,000 pages. Brother shows a street price for the printer of $900.00, but I have seen many internet stores selling them for about $700.00. At these prices for a 30ppm machine, they are gaining quickly in popularity. The DR-700 cartridge is rated for 40,000 pages, and has a list price of about $120.00 USD (as of 8/1/03). While this is on the inexpensive side, the drum can be used again, so all that has to be done is carefully clean the cartridge out!
As with the HL-1240 engine, this cartridge system is unique in a number of ways. A few of these are that the waste toner is recycled back into the supply chamber to be re-used, it uses a cleaning roller instead of a wiper blade, and it uses a Primary Corona WIRE and a Transfer ROLLER. Both the primary corona wire and the transfer roller are inside the drum cartridge. New drums are not currently available, but the OEM drum should last one cycle. The Primary Corona wire has a built in cleaner that should be on the Right side (home position) of the cartridge when not in use.
This engine is also unique in the sense that the developer roller in the toner cartridge actually touches the drum. There is not an air gap as in other cartridges. In other words, this engine does not use what is commonly known as "jumping technology" to transfer the image from the developer roller to the drum. This unusual fact doesn't change how the cartridge is recycled, but can lead to some interesting problems if BOTH the Toner and OPC cartridges are not cleaned properly.
IMPORTANT: This laser engine works differently than other “standard” engines we have seen before. If you are to do these cartridges successfully, throw out any pre-conceived notions you may have based on other cartridges, and read the following carefully.
As explained in the article we wrote on the toner cartridge, the remaining toner (100g or so!) must be completely removed from the supply chamber before adding new toner. This cannot be stressed enough, failure to do this will cause back grounding. In addition to contaminating the toner cartridge, this will also contaminate the cleaning section of the drum cartridge, which in turn will contaminate the toner cartridge again.
The DR-700 drum units are a more modern version of the DR-400, but some of the same issues still apply. The cleaning section of the drum cartridge consists of 2 (two) cleaning rollers and a recovery blade. The older HL-1240 (DR-400) drum units have a felt brush that cleans the drum. These cartridges have a foam cleaning roller that cleans the drum, and a metal roller that cleans the cleaning roller. The metal roller will attract excess toner from the foam roller so that the foam roller can do its job properly. (This is similar to the metal rollers in the HP-8000 fuser assemblies). The foam cleaning roller has two opposite charges placed on it during the print cycle. The first attracts any remaining toner off the drum. The second repels the toner off the roller back onto the drum where it then transfers back into the toner cartridge. This is all done in a timing sequence that does not interfere with the printing process.
If the cleaning roller becomes contaminated with bad toner that will not charge, the roller will not be able to clean itself, and back grounding will occur. It seems to be the nature of contaminated toner that it will accept most of the charge to be cleaned off the drum, but it will not accept the charge that would allow the roller to clean itself off at all. A properly working cleaning roller will at any given time have only a small amount of toner on it. Once contaminated, toner will accumulate, which will only cause the problems to get worse. While the metal roller will attract some toner from the foam roller, it cannot handle the amount that contaminated toner will bring. The buildup from the metal roller will start to press the toner back into the foam roller causing back-grounding.
While this system is a little more forgiving than the older one, if the back-grounding is allowed to continue, the foam roller will become impacted with toner, and will be very difficult if not impossible to clean.
Since the developer roller actually contacts the drum, some toner is transferred back into the supply of the toner cartridge. Once you print with a bad toner cartridge, the drum unit will become contaminated. Even when you change out the toner with a good properly recycled or new OEM cartridge, the drum unit will transfer some of the bad toner back into the good toner cartridge, which will again cause back grounding. Both cartridges will be contaminated again.
The remaining 100g or so of "toner" in the toner cartridge is just below the bare minimum that can maintain the proper charge level. When the change toner light comes on, the toner will not charge up to the proper level and will cause the back grounding. As the toner cartridge reaches the end of its useful life, the printer senses the low charge level in the toner supply and will try to keep the charge level up. This constant charging keeps an almost "empty" cartridge from back grounding. Once the printer cannot get the remaining toner up to the minimum charge, the change toner light comes on. The cartridge at this point will still be printing properly. If you were to take that same cartridge out of the machine for a few days, and then put it back in the printer with out doing anything to it, the cartridge will shade. This will happen because the charge level that the printer was trying so hard to keep up has dissipated out and the materials left can no longer accept a proper charge.
What does this all mean?
Make sure that your cartridge techs thoroughly clean out the supply chamber of the toner cartridge.
In the event that they forget, and you have a shading cartridge. The toner must be completely cleaned out again. (Do not use the toner over!!) and NEW fresh toner MUST be installed.
- The drum unit has to be taken apart and cleaned out with emphasis on the cleaning roller area. This is a very simple process but very necessary once contaminated.
| Required Tools | |
OEM DR-700 drum in good shape.
Cotton Swabs (CT-100)
Isopropyl Alcohol (FR-8)
DPP Drum Padding Powder
| Materials Needed | |
Phillips head screw driver.
Small Common screw driver
Safety goggles and breathing mask.
Vacuum approved for toner
| Disassembly | |
Remove the top two screws See Figure 1
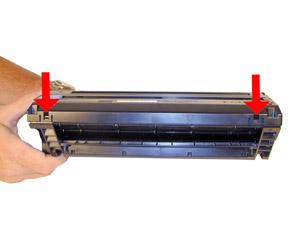
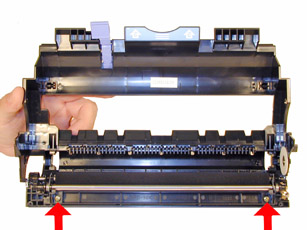
There are two tabs, one on each side of the cartridge. Press them in and lift up the top cover slightly. See Figure 2
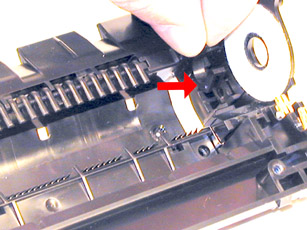
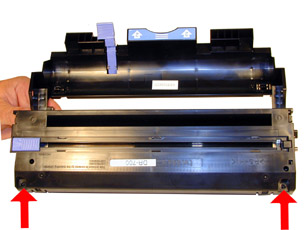
Pry up the two tabs on the back side of the cartridge. See Figure 3
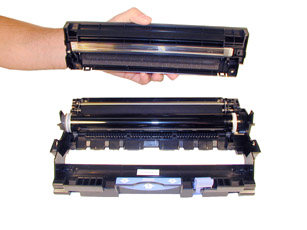
- Carefully lift off the cover. It may be necessary to press the top tabs down again when lifting the cover. See Figure 4
FIGURE 1
FIGURE 2
FIGURE 3
FIGURE 4
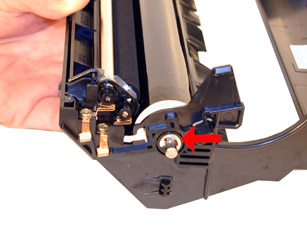
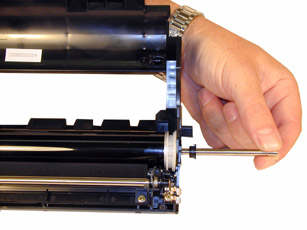
- Remove the E-ring from the Non Gear side of the drum axle shaft. See Figure 5
- Press the axle out about 1/4” from the cartridge. Remove the opposite E-ring. See Figure 6
- Remove the drum axle from the Non Gear side of the drum. If you try to pull it out from the gear side, the shaft will jam up on the drum ground contact and damage the contact. See Figure 7
- When the drum axle is removed, most likely the small drum bushing will come loose. Remove the bushing and place aside so it does not become lost. See Figure 8
FIGURE 5
FIGURE 6
FIGURE 7
FIGURE 8
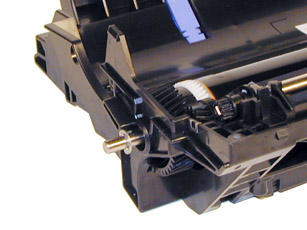
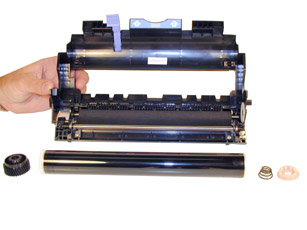
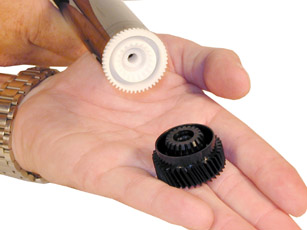
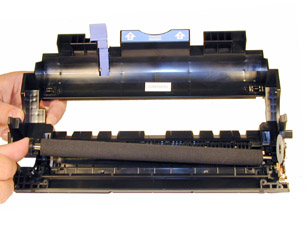
Carefully remove the drum. Note that the gear side actually has two gears. One attached, one not. The opposite side has a separate hub and spring. Do not loose these parts! See Figure’s 9, 10, and 11
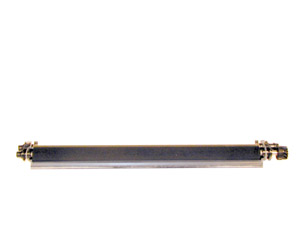
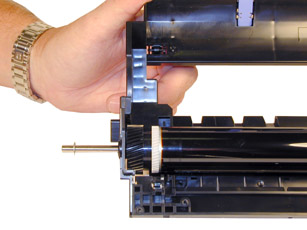
Carefully lift out the transfer Roller. The two U-shaped rollers will come out with the roller. Be very careful not to touch the roller with your skin. As with any transfer Roller, the oils naturally present in your skin will be absorbed by the roller and interfere with the transfer process, causing light print. See Figures 12 & 13
FIGURE 9
FIGURE 10
FIGURE 11
FIGURE 12
Remove the small black spacer from the left side of the cartridge. This spacer presses against the shaft of the developer roller, and is easily lost. The cartridge will not function properly with out it. See Figure 14
With compressed air, blow off the Transfer roller. Unless you have a statically grounded vacuum, do not vacuum this roller.
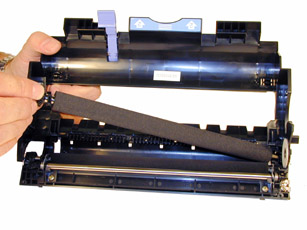
Remove the two screws from the cleaning roller assembly, remove the assembly. See Figure 15
Vacuum or blow off the foam cleaning roller. Take care not to loose the two small black gears. They can come loose during cleaning. Make sure you remove any remaining toner from the pores of the foam. Be very careful not to damage the recovery blade located next to the cleaning roller. If there is any toner on the metal roller, scrape it off with a piece of hard plastic, until the roller is clean. Do not use any chemicals of any type on either roller. They will react with either the toner or the roller and ruin the cartridge. Vacuum any remaining toner from the rest of the assembly. The rollers can be removed from their housing, but we have found it not to be necessary. See Figures 16 & 17
FIGURE 13
FIGURE 14
FIGURE 15
FIGURE 16
Clean the primary corona wire and grid located in the top cover, with a cotton swab and alcohol. See Figure 18
Install the small black transfer roller spacer into its slot on the left side of the cartridge. See Figure 19
Remove the two U-shaped holders from the transfer roller, and install in their slots. See Figure 20
FIGURE 17
FIGURE 18
FIGURE 19
FIGURE 20
Being careful not to touch the transfer roller with your fingers, snap the roller into place. See Figure 21
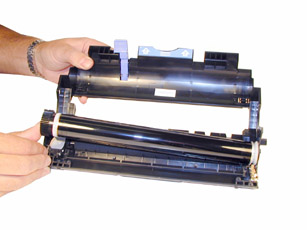
Install the drum, gears and spring. See Figure 22
Install the drum axle gear side first and “E” ring on that side. See Figure 23
Install the small round drum bushing into its place on the non-gear side of the cartridge, Install the remaining E ring. It may be necessary to press the cartridge down on the drum axle in order to see the slot for the E ring on the axle shaft. See Figure 24
FIGURE 21
FIGURE 22
FIGURE 23
FIGURE 24
Install the cleaned cleaning roller assembly. Be careful not to damage the copper contacts when installing. See Figures 25 & 26
Replace the cover. Make sure the 4 tabs all snap into place. See Figure 27
Install the top two screws. See Figure 28
FIGURE 25
FIGURE 26
FIGURE 27
FIGURE 28


| Reset Procedure | |
If the machine is saying to change the drum unit, do the following. If the drum unit was cleaned because of contamination, the reset is not necessary.
After replacing the drum unit, keep the front cover open and press "Go" for at least 4 seconds. Close the top cover. The counter is reset!
| Troubleshooting | |
Back grounding: (Gray Streaks) This is usually caused by contaminated toner. See the explanation at the beginning of this article for more information.
Dark Black Vertical Streaks: This is normally caused by either a dirty primary corona wire, or the blue corona wire cleaner is not in its "home" position on the right side of the cartridge.
Light Print: This can be caused by a missing small spacer for the transfer roller. Without this spacer, the roller shaft will not touch its contact properly. This can also be caused by a dirty or worn transfer roller. So far in our tests, the transfer roller should last at least 2 cycles.
Solid Black Pages: Bad drum ground contact. Probably from the drum axle shaft to the contact gear inside the drum.
Perfectly straight thin black lines down the page: Scratched drum.
Black dots or marks that repeat every 95mm: Bad drum
Black dots or marks that repeat every 55mm: Bad Developer roller
Black dots or marks that repeat every 53mm: Bad foam cleaning roller
© 2003 Summit Laser Products, Inc. Any attempt to reproduce any part of these instructions without the written consent of Summit Laser Products, Inc is prohibited. All registered trademarks are the property of their respective owners.
![]()
Contact Summit Laser Products
Toll Free Orders: 800-221-3516
Toll Free Fax: 888-791-9188International Orders: +1-631-218-8376
International Fax: +1-631-218-3285Domestic Sales E-mail: sales@summitlaser.com
International Sales E-mail: export@summitlaser.comTechnical Support: +1-631-218-8376
Technical Support E-Mail: tech@summitlaser.comMail: Summit Laser Products
95 Orville Drive, Bohemia, New York 11716 - USAPlease report any broken links to: webmaster@summitlaser.com
Authorized Summit Laser Distributors
| Ukraine
Distributor SINT Company order@sint-master.com
|
All products on this web site, unless stated otherwise, are independently produced and distributed by Summit Laser, and not by the individual manufacturers of the copiers and printers referenced herein. Use of trade styles and trademarks of the individual manufacturers of the copiers and printers referenced herein are for descriptive purposes only and are not intended to imply any form of endorsement by the individual manufacturers of the refill or supply products offered herein. As such, all items in this catalog are deemed to be construed as “for use in,” “for use with or compatible with,” whether or not stated for each individual item as opposed to the group of items.