

| Home |
New Arrivals!
|
Company Info
|
Publications
|
Special Features
| Contact Us |
 |
|
|
|
|
|
|

Remanufacturing the
Samsung ML-1750 Toner Cartridge
DOC-0332
| Overview | |
First released in March 2003, Samsung ML-1710 and ML-1750 Printers are based on one of Samsung’s newest engines. The ML-1750 series runs at 17 ppm with a maximum resolution of 1200 dpi.
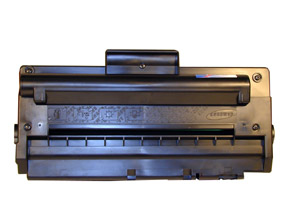
These cartridges are very similar to the SCX-4216, but there are differences. The main difference is that the SCX 4216 cartridge has a fuse to reset the printer. The ML-1710/1750 does not. There is a spot for the fuse on the ML-1750, but it is not used. There are also some cosmetic differences. Figures 1 & 2 show the differences between the two.
These cartridges do not have a drum cover, and come new with a piece of heavy paper taped around the cartridge. (See Figure 3) All new cartridges opened so far have shown some toner leakage on the drum that would have shown on any prints.
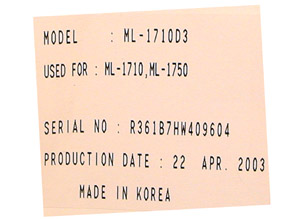
The standard cartridge (Samsung part# ML-1750D3/XAA) comes new with 90g toner, and is rated for 3,000 pages at 5% coverage. If you look at the cartridge, it appears that Samsung has discovered our industry, the top of the cartridge is embossed with Samsung all over it. Samsung cartridges also all now come with a card that states the cartridge is a genuine Samsung. This card also gives the Model #, Serial #, and Production date. See Figure’s 4 & 5
|
|
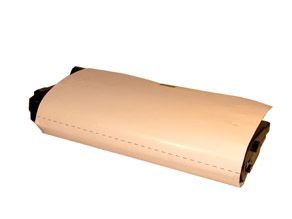 FIGURE 3 |
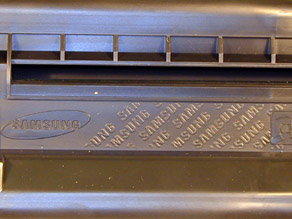
FIGURE 4 |

|
|
| Required Tools | |
Toner approved vacuum.
A small Common screw driver
A Phillips head screwdriver
Needle nose pliers
| Materials Needed | |
90g Toner
Conductive Grease
Drum lubricating powder
| Disassembly | |
- Place the cartridge with the handle facing up. Remove the 5 top cover screws. See Figure 6
- On the front edge of the cartridge, there are two tabs. Press these two tabs in, and lift the front edge of the cover up. See Figure 7
- Next to the handle of the cartridge to the right and left, there are 2 more plastic tabs. GENTLY press them in, and remove the cover. See Figure 8
CAUTION: The upper half of the toner hopper is being removed. If there is a lot of toner left in the hopper, it can dump out all over! Vacuum the hopper clean.
With the toner hopper away from you, remove the three screws on the left side end cap. Remove the end cap. See Figure 9
 FIGURE 6 |
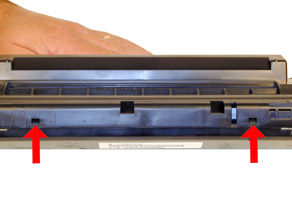 FIGURE 7 |
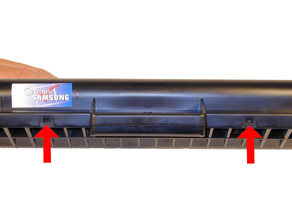
FIGURE 8 |
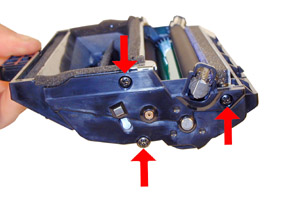
FIGURE 9 |
- Remove the three screws on the right side end cap. Remove the end cap. See Figure’s 10 & 11
- Also on the right side there is a series of gears under the end cap. Make a note of the location of each gear, and remove them. See Figure’s 12 & 13

FIGURE 10 |
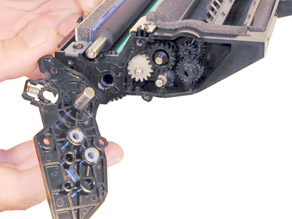
FIGURE 11 |

FIGURE 12 |
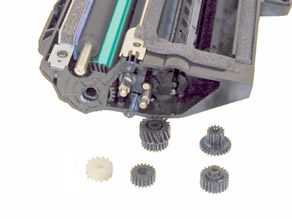
FIGURE 13 |
- Remove the PCR. See Figure 14
- Clean the PCR with your normal PCR cleaner.
WARNING: Do not clean the OEM PCR with alcohol, as this will remove the conductive coating from the roller. If the PCR is an aftermarket, follow the cleaning methods recommended by the manufacturer. If the PCR is an OEM, we recommend it be cleaned with your standard PCR cleaner.
There are 2 screws on the PCR cleaner Assy. Remove them and gently pry the blade up. Note that there are not any alignment tabs or posts to worry about. This PCR cleaner also has what can be considered a wiper blade. It is a very flimsy blade attached to the metal bar. Wipe this blade down with a clean lint free cloth before re-installing. See Figures 15 & 16
It is very important that the PCR cleaner be cleaned. Vacuum or blow off any residual toner from the foam/felt.
With the PCR Cleaner Assembly removed, the drum can easily be removed by lifting it out. See Figure 17
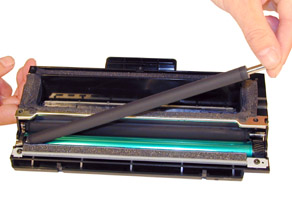
FIGURE 14 |

FIGURE 15 |
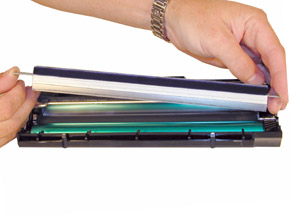 FIGURE 16 |

FIGURE 17 |
- Clean out any remaining toner from the cartridge.
- Press in on the bottom tab of the Developer roller plate (Right Side) to release it. See Figure 18
- With a small common screwdriver, press the entire plate towards the edge of the developer roller cavity, and lift up. There is a tab on the top of the plate that has to be released. The Plate should come loose. See Figure 19
- Gently pry out the roller plate from the cartridge. The foam seal, and plastic flat washer will come out with it. Be careful not to damage the foam seal, or loose the flat washer. See Figure 20
- Remove the Developer Roller. Be careful not to damage or lose the flat washers on the roller. See Figure 21

FIGURE 18 |
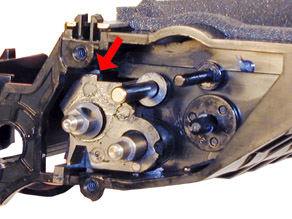 FIGURE 19 |
 FIGURE 20 |
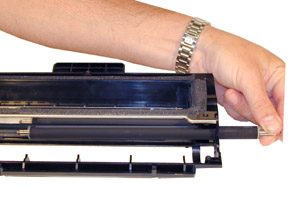
FIGURE 21 |
- It is highly recommended that the Doctor Blade be cleaned. Failure to do so will cause streaking. The Doctor Blade can be cleaned with out removing it. Dampen a cotton swab with alcohol, and clean the blade. Be careful not to press too hard and damage the blade. If the blade has a heavy buildup of toner on it, clean it with Acetone, and then alcohol. Removing the blade is difficult because of the foam seals attached. If the seals are torn, the cartridge will leak. That is why we do not recommend it. Once replacement Dr. Blades are available, they will have to come with replacement foam. See Figure 22
- Replace the Developer roller, and flat washers. See Figure 23
- If no grease is left on the gears and gear shafts, or it is contaminated with toner clean it all off. Replace it with white lithium grease. Be sure to clean and grease the gear shafts, and inside the gear. See Figure 24
- Replace the roller plate and 5 gears. When installing the plate, do the opposite of how it came out. Keep it towards the front edge so that the small tab on top fits behind the wall of the cartridge. Look carefully at the picture of the gears. Each gear must fit in this exact way. The gears labeled in order of installation. See Figure 25
 FIGURE 22 |
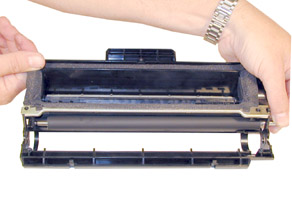
FIGURE 23 |

FIGURE 24 |
 FIGURE 25 |
Install the new drum in place. See Figure 26
Install the PCR cleaner Assy. and two screws. See Figure 27
Clean the conductive grease off the left side (Non Gear) end cap and replace with fresh grease. Replace the end cap and three screws. See Figure 28
- Install the PCR. Make sure that the PCR gear is on the correct side and that the shaft is in the PCR holder. See Figure 29
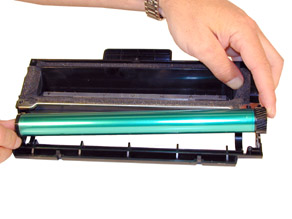 FIGURE 26 |
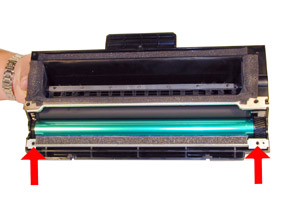
FIGURE 27 |
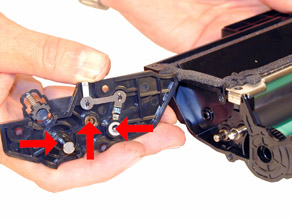
FIGURE 28 |
FIGURE 29 |

- Install the right side end cap, and screws. Make sure the PCR fits correctly in its holder, and all the gears are aligned. See Figure 30
- Fill the hopper with 90g of toner. See Figure 31
- This can also be done through the fill plug, but the fill plug tends to leak and will probably have to be sealed with silicon.
- Carefully snap the cover on making sure all the tabs lock in place. See Figure’s 32 & 33
- Install the five screws in the top cover. See Figure 34
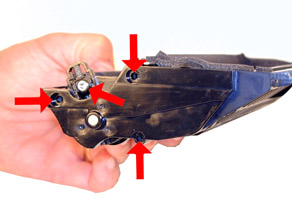
FIGURE 30 |
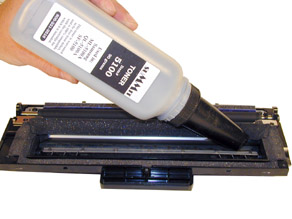
FIGURE 31 |
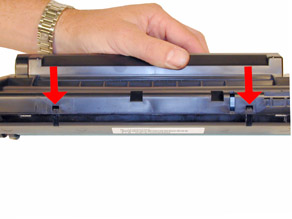 FIGURE 32 |
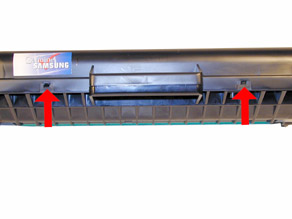 FIGURE 33 |
FIGURE 34 |
|

| Printer Settings | |
All the printer settings are changed through the printer driver properties. The Graphics tab has the resolution settings, as well as the toner save function. From this same tab, if you click on Advanced Options, you now have access to the Darkness settings.
| Common Cartridge Problems | |
Even Light Prints: Check to see if the Toner Save feature has been enabled. The Toner Save light will be on. This is accessed from the printer driver properties. (See “Printer Settings” above).
A Dirty or Bad Primary Charge Roller (PCR); located Inside the cartridge, this will show on the test print as vertical gray streaks down the page, as a gray background throughout the page, as ghosting where part of a previously printed area is repeated, or as a mark that repeats every 40mm.
Dirty PCR Connection; This will show as horizontal dark black bars across the page, or as shading throughout the page.
Scratched Drum; This is shown by a very thin, perfectly straight line that runs from the top to the bottom of the test page.
Chipped Drum; This will show as a dot or series of dots that repeat every 78mm.
Light Damaged Drum; This will show up as a shaded area on the test print that should be white. Again this will repeat every 78mm.
Bad Wiper Blade; This will show as either a gray line approximately 1/8" thick, or as shading across the entire page. In either case there will be a film of toner on the drum surface.
Bad Developer Roller; This will show up as light print or as a mark that repeats every 45mm
| Machine Error Codes | |
These machines do not have a display panel. They use a series of LED’s to indicate a problem. There are two lights on the control panel, the ONLINE/ERROR, and the TONER SAVE lights. The Online light is a two color LED, Red and Green.
The user manual for these machines only has very basic information listed as follows:
If both lights are blinking, the machine has problems and needs service. (Helpful isn’t it!)
If the Online light is on steady red, and the toner save light is off, there could be a number of problems. Either there is a paper jam, the front cover is open, or the toner cartridge is empty.
If the Online light is on blinking Green, and the toner save light is off, there could also be a number of problems/reasons. If the printer is receiving data, the Online/Error LED will blink slowly. If the printer is printing, the Online/ Error LED will blink fast. The Online/ Error LED will also blink if it is in the manual feed mode, and no paper is in the manual feeder, or if the “Cancel” button was pressed while the printer was receiving data.
© 2003 Summit Laser Products, Inc. Any attempt to reproduce any part of these instructions without the written consent of Summit Laser Products, Inc is prohibited. All registered trademarks are the property of their respective owners.
![]()
Contact Summit Laser Products
Toll Free Orders: 800-221-3516
Toll Free Fax: 888-791-9188International Orders: +1-631-218-8376
International Fax: +1-631-218-3285Domestic Sales E-mail: sales@summitlaser.com
International Sales E-mail: export@summitlaser.comTechnical Support: +1-631-218-8376
Technical Support E-Mail: tech@summitlaser.comMail: Summit Laser Products
95 Orville Drive, Bohemia, New York 11716 - USAPlease report any broken links to: webmaster@summitlaser.com
Authorized Summit Laser Distributors
| Ukraine
Distributor SINT Company order@sint-master.com
|
All products on this web site, unless stated otherwise, are independently produced and distributed by Summit Laser, and not by the individual manufacturers of the copiers and printers referenced herein. Use of trade styles and trademarks of the individual manufacturers of the copiers and printers referenced herein are for descriptive purposes only and are not intended to imply any form of endorsement by the individual manufacturers of the refill or supply products offered herein. As such, all items in this catalog are deemed to be construed as “for use in,” “for use with or compatible with,” whether or not stated for each individual item as opposed to the group of items.