Remanufacturing the Canon “P” Type Toner Cartridges
0343
Released in
February 2004, the Canon ImageClass 2300 printer engine is based on
a new 20ppm, 1200 DPI laser engine. The style of this cartridge is a
departure for Canon against the “normal” style cartridge we have
become used to. This cartridge is actually somewhat similar to the
4600, but much simpler. The cartridge is rated for 10,000 pages at
5% coverage. The “P” cartridge is built to last. In comparison to
some of the other new Canon cartridge to date, the parts in these
cartridges seem very durable. Even the plastic is thicker than
normal these days. At this point, the wiper blade, PCR and drum will
last at least one cycle. That may change as time goes on though.
The “P”
cartridge does not have an internal drum cover. It comes with a
large orange plastic cover that snaps over the drum section. It is
highly recommended that these covers be installed to prevent any
drum damage. See Figure 1
How to run
test pages, Printer trouble shooting as well as cartridge defect
repetitions will be covered at the end of this article.
-
Canon P
Black Toner 600g
-
New Wiper
Blade (When Available)
-
New drum
(When Available)
-
New Doctor
Blade (When Available)
-
Sealing
Strip (When Available)
-
Lint free
cotton cloths
-
Toner
magnet cloths
1) Remove the
two small springs from the back edge of both sides of the cartridge.
See Figures 2 & 3
2) Remove the
metal pin from the right side (gear side) of the cartridge. See
Figure 4
|
|
Figure 1 |
Figure 2 |
|
|
Figure 3 |
Figure 4 |
3) Turn the
cartridge upside down, and separate the two halves. See Figure 5
4) On the drum
half, remove the metal and plastic drum axle pin. See Figure 6
5) Remove the
white plastic drum bushing and two screws. Note that these screws
are much smaller than the screws used in the rest of this cartridge.
See Figures’ 7 & 8
|
|
Figure 5 |
Figure 6 |
|
|
Figure 7 |
Figure 8 |
6) Remove the
drum. See Figure 9
7) Remove the
PCR. See Figure 10
8) Remove the
two screws and the wiper blade. Slide the blade forward to keep from
damaging the PCR holders. Also be careful not to damage the recovery
blade. See Figure 11
9) Clean out
all the waste toner from the hopper.
10) Install
the wiper blade and two screws. See Figure 12
|
|
Figure 9 |
Figure 10 |
|
|
Figure 11 |
Figure 12 |
11) Clean the
PCR with your preferred PCR cleaner, and install in the cartridge.
The metal shaft is stepped, but both sides are the same. See Figure
13
12) Install
the drum large gear side first. See Figure 14
13) Install
the drum axle pin and screw. See Figure 15
14) Install
the drum bushing and two screws. The side of the bushing that has
the thicker lip should be on the outside. See Figures’ 16 & 17
|
|
Figure 13 |
Figure 14 |
|
|
Figure 15 |
Figure 16 |
15) Place the
drum/waste hopper aside.
16) On the
toner hopper, remove the three indicated gears. See Figure 18
17) Remove the
right side magnetic roller end cap and two screws. See Figure 19
18) Remove the
left side magnetic roller end cap and two screws. See Figure 20
|
|
Figure 17 |
Figure 18 |
|
|
|
Figure 19 |
Figure 20 |
19) Remove the
magnetic roller assembly. Be careful not to lose the white spacers.
See Figures’ 21 & 22
20)
Remove the two screws and the Doctor Blade. See Figure 23
21) If you are
going to seal the cartridge, take a long thin screwdriver, push out
and remove the seal plug. See Figure 24
22) Clean out
the remaining toner from the hopper
23) If you are
going to seal the cartridge, seal it now.
|
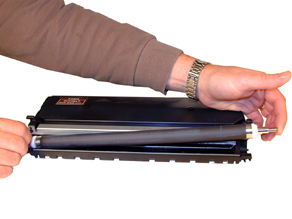 |
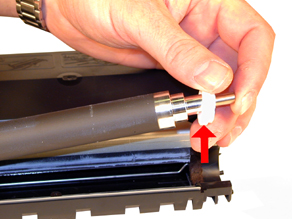 |
Figure 21 |
Figure 22 |
|
|
Figure 23 |
Figure 24 |
24) Remove the
fill plug, and fill with 600g Canon “P” toner. Check for leaks. If
you are not sealing the cartridge, the hopper will be filled in step
32. See Figure 25
25) Check to
see that the mixing blade is in its proper slot. See Figures’ 26 &
27.
Try not to
move the cartridge too much so that the mixing blade stays in place.
25) Install
the Doctor Blade and two screws. See Figure 28
|
|
Figure 25 |
Figure 26 |
|
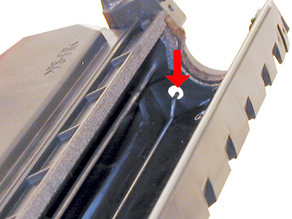 |
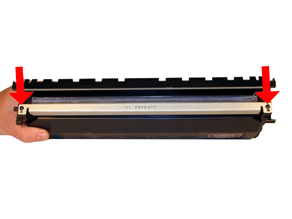 |
Figure 27 |
Figure 28 |
26) Install
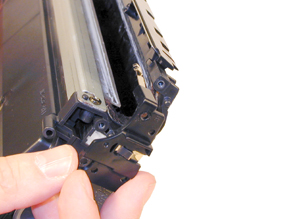
the right side (Keyed) end cap and two screws. Make sure that the
metal contact strip is in the correct slot. See Figures’ 29 & 30
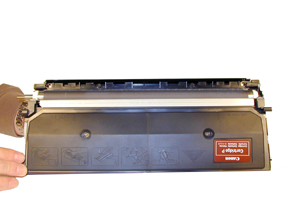
27) Install
the magnetic roller assembly. The keyed end of the roller should fit
into the keyed end cap. See Figure 31
28) Install
the left end cap and two screws. See Figure 32
|
 |
 |
Figure 29 |
Figure 30 |
|
 |
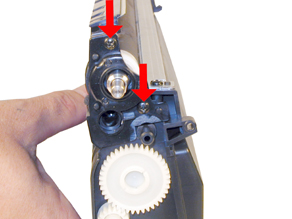 |
Figure 31 |
Figure 32 |
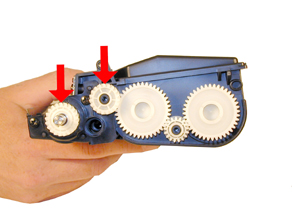
29) Install
the magnetic roller drive gear and small idle gear on the hopper.
See Figure 33
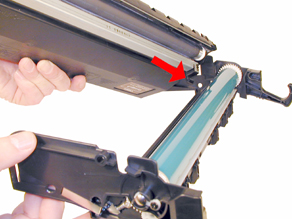
30) Take the
long mixing blade gear, and fit it into the hole. Make sure that the
slot in the gear fits over the metal mixing blade bar. See Figure 34
31) Make sure
that the gears all turn freely.
32) If you did
not seal the cartridge, fill the hopper with toner now.
33) Install
the two halves together. Insert the plastic pin from the non-gear
side into the hole in the waste chamber. See Figure 35
34) Install
the metal hinge pin. Keep the end flush with the edge of the
cartridge. See Figure 36
|
 |
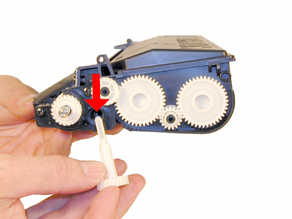 |
Figure 33 |
Figure 34 |
 |
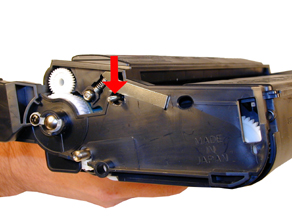 |
Figure 35 |
Figure 36 |
35) Install
the two small springs on the back edge of each side. See Figures’
37 & 38
36) Install
the drum cover to protect the drum from damage. See Figure 39
There are no
reset fuses or procedures for this cartridge.
 |
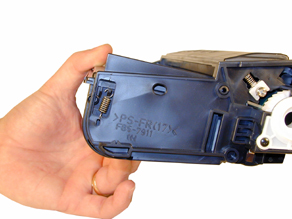 |
Figure 37 |
Figure 38 |
 |
Figure 39 |
The easiest
way to get a test print is to run a copy. Just make sure the scanner
is clean before you do.
The error
messages are in plain English (No number codes). The only one not
completely clear is the following:
Replace
cartridge: approximately 150 pages are left in the cartridge
Drum 94mm
Magnetic roller 63mm
PCR 44mm
© 2003-2004 Summit Laser Products, Inc.
Any attempt to reproduce any part of these instructions without the written
consent of Summit Laser Products, Inc is prohibited. All registered trademarks
are the property of their respective owners.

| 