|
First introduced in April 2004, the HL-6050 laser printers are the
next generation of Brother's newer higher quality engines. Last
month we went over the TN-670 toner cartridges, this month we finish
up with the DR-600 drum cartridge.
The HL-5150D
printer is a 24ppm, 1200 dpi machine that comes standard with a duplexer built
in. With a list price of $241 including the duplexer, these machines are
going to be very popular.
In July 2004,
I found pricing on the DR-600 ranging anywhere from $93.88 to $149.99 on the
internet.
Currently
there are two machines based on the HL-6050 engine: The HL-6050, HL-6050D,
HL-6050DN, and the HL-6050DW
The OEM
stated yield is ESTIMATED at 30,000 pages. There are disclaimers in the
manual that basically say you will not get anywhere near that yield. The
following is taken directly from the HL-6050 user manual:
"At
5% print coverage (A4 or letter size). The actual number of printed pages will
vary depending on the average type of print job and paper.
There are
many factors that determine the actual drum life, such as the temperature,
humidity, type of paper, type of toner used, number of pages per print job and
so on. Under ideal conditions, the average drum life is estimated at up to
30,000 pages. The actual number of pages that your drum will print may be
significantly less than this estimate. Because we have no control over the many
factors that determine the actual drum life, we cannot guarantee a minimum
number of pages that will be printed by your drum.”
We are not including the theory on these cartridge again as
it is basically the same as the TN-460/560 cartridges. The difference here is
that instead of a cleaning felt, these cartridges use a cleaning roller
assembly. This assembly still returns the toner back to the toner cartridge as
the felt did, but this roller also has a chamber that collects small amounts of
toner that did not charge and paper dust. All this must be removed. The best way
is with compressed air.
In our tests so far, the cleaning roller system seems to
work better than the felt, but testing is still on going. Time will tell…
Supplies Needed
Tools Required
Disassembly
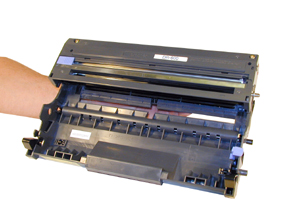
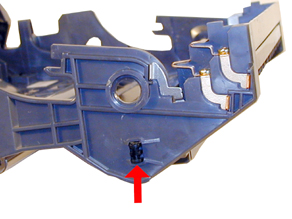
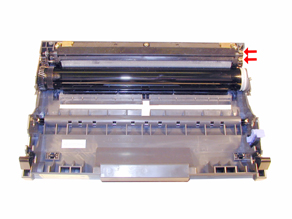
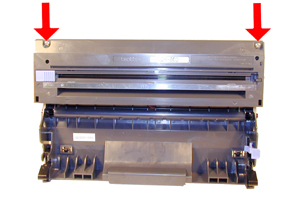
1) Remove the top two screws See Figure 1
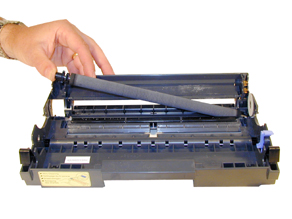
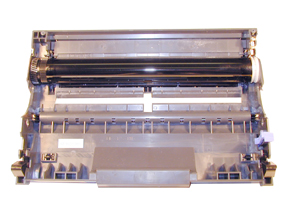
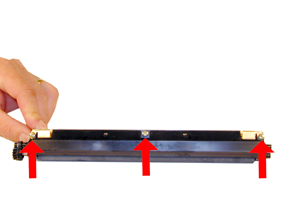
2) Lift the
top cover up towards the empty toner cartridge cavity and remove from the
cartridge. See Figure 2
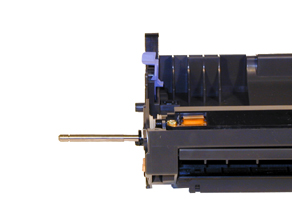
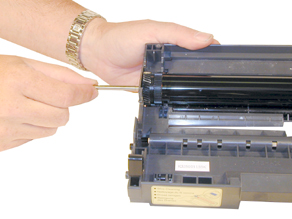
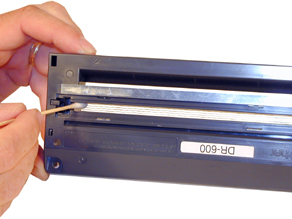
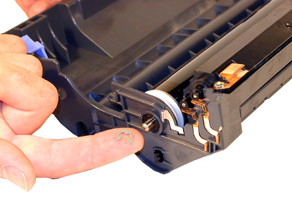
3) Remove the
E-ring from the Non Gear side of the drum axle shaft. See Figure 3
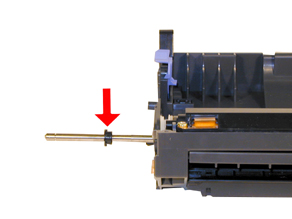
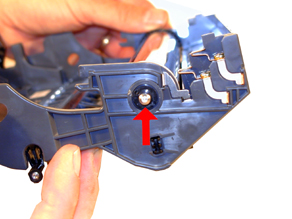
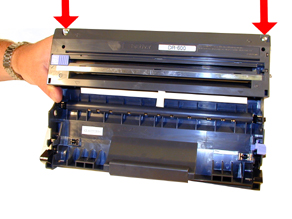
4) Remove the
opposite E-ring. See Figure 4
 |
 |
Figure 1 |
Figure 2 |
 |
 |
Figure 3 |
Figure 4 |
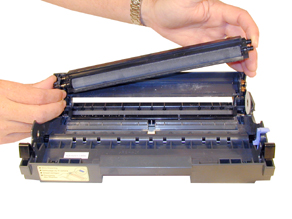
5) Remove the drum axle from the Non Gear side of the drum. If you
try to pull it out from the gear side, the shaft will jam up on the
drum ground contact and damage the contact. See Figure 5
6) Be careful
not to loose the round drum spacer. See Figure 6
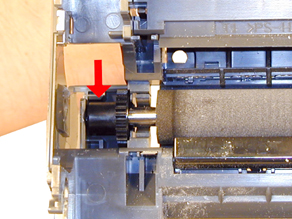
7) Carefully
remove the drum. Note that the gear side actually has two gears. One attached,
one not. The opposite side has a separate hub and spring. Do not loose these
parts! See Figure 7 and 8.
|
|
Figure 5 |
Figure 6 |
|
|
Figure 7 |
Figure 8 |
8) Carefully lift out the cleaning roller assembly. Be very careful
not to touch the roller with your skin. As with any cleaning Roller,
the oils naturally present in your skin will be absorbed by the
roller and interfere with the cleaning process. See Figure 9
9) Lift out
the transfer roller assembly. Be very careful not to touch the roller with your
skin. The oils naturally present in your skin will be absorbed by the roller and
interfere with the transfer process, causing light print. See Figure 10
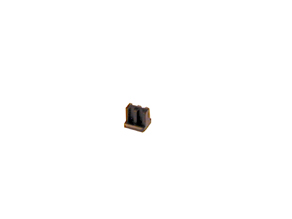
10) IMPORTANT: Note the small piece of black plastic spacer on the right side of
the roller, (side opposite the gear). This spacer keeps the transfer roller
touching the electrical contacts on the left side of the cartridge. Be very
careful not to loose this spacer! The cartridge will either print very light or
1/2 pages if it is missing. It is best to remove this spacer while cleaning the
cartridge. See Figure's 11 and 12
|
|
Figure 9 |
Figure 10 |
|
|
Figure 11 |
Figure 12 |
11) With compressed air, blow off the Transfer roller. Unless you
have a statically grounded vacuum, do not vacuum this roller.
12) Reinstall
the small black transfer roller spacer. See Figure 13
13) Install
the transfer roller. Make sure the U-shaped holders fit into their respective
slots. See Figure 14
14) Check the
outside of the cartridge to make sure that the small black spacer is correctly
positioned. See Figure 15
15) Install
the drum and associated gear, hub, and spring. See Figure 16
|
|
Figure 13 |
Figure 14 |
|
|
Figure 15 |
Figure 16 |
16) Install the drum axle from the drum gear side of the cartridge.
See Figure 17
17) Install
the black drum axle spacer. See Figure 18
18) Install
the two E-rings on each side of the drum axle gear side first. See Figure 19
19) Remove
the three screws that hold the cleaning roller assembly together. Pry the cover
off. Vacuum or blow off the cleaning roller. The dust inside is a combination of
toner and paper dust, all of it must be removed. Make sure you don’t loose the
gears! See Figures 20 & 21
|
|
Figure 17 |
Figure 18 |
|
|
Figure 19 |
Figure 20 |
20) Install the 3 screws into
the cleaning assembly. See Figure 22
21) Install
the cleaning roller assembly and two screws. Check to make sure the two contact
springs are not dirty or bent. See Figure 23
22) Clean the
primary corona wire and grid with a cotton swab and alcohol. See Figure 24
|
|
Figure 21 |
Figure 22 |
|
|
|
Figure 23 |
Figure 24 |
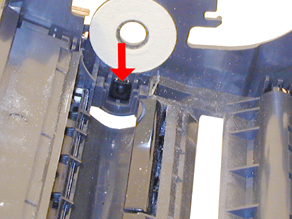
23) Install the top cover, hook the back edge over the tab, and
press down. See Figure 25
24) Install
the top two screws. See Figure 26
Reset Procedure
Press the cover release button, and open the front cover.
With the cover still open, Press and hold the GO button until "Drum
Clear" is displayed. Release the GO button.
The counter is reset!
Troubleshooting
Back grounding: (Gray Streaks) This is usually caused by contaminated toner. Clean
all remaining dust from the cleaning roller assembly, blow cleaning
roller clean with compressed air.
Dark Black Vertical Streaks: This is normally caused by either a dirty primary corona wire, or
the blue corona wire cleaner is not in its "home" position on the
left side of the cartridge.
Light Print: Can be caused by a dirty or worn Transfer Charge Roller. These
rollers are located inside the cartridge. So far in our tests, they
should last at least 2-3 cycles. See next section also.
Light or 1/2 page prints: This is caused by a missing transfer roller spacer. The spacer is a
small piece of black plastic that sits next to the right end of the
transfer roller. This piece keeps the transfer roller touching the
electrical contact on the opposite side of the roller. If missing,
the roller will move and can cause light or 1/2 page prints.
Black or white horizontal Lines: Black lines normally appear when there is a build up of toner, White
when there is a dead spot, or contamination of the roller. I the
lines repeat every 94 mm (approx. 3 3/4"); the drum is bad, or
dirty. If they appear every 39mm (approx. 1 9/16"), the developer
roller in the toner cartridge is bad or dirty.
Solid Black Pages: Bad drum ground contact. Probably from the drum axle shaft to the
contact gear inside the drum.
Perfectly straight thin black lines down the page: Scratched drum.
Black dots that repeat every 94mm (3 3/4"): Chipped drum or something is stuck to the drum surface.
|