Remanufacturing
the Lexmark E330 Toner Cartridges
0354
The Lexmark E330 was introduced in June 2004. Based on a Lexmark
22-27ppm (depending on the printer), 1200 DPI engine, and with a
street price of around $199.00(September 2004) for the E232, these
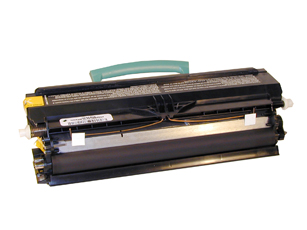
machines are becoming very popular. Two cartridges are used for
this engine, a toner and drum unit. These machines have standard
and Return program (Prebate) cartridges and all have chips that
shut them down. The new chips must be replaced each cycle. New replacement
chips are available now. A listing of the cartridges available as
well as pricing follows. As simple as these cartridges are, there
is plenty of room for a nice profit.
Cartridges:
Part# Type Yield List Price
12A8400 Std. Return cartridge 2,500 $74.00*
12A8300 Standard cartridge 2,500 $94.00*
12A8405 HY Return cartridge 6,000 $119.00*
12A8305 High Yield STD. cartridge 6,000 $139.00*
12A8302 Drum cartridge 30,000 $62.50*
*Pricing as of September 2004
The High yield cartridges only work in the E330 series, not the
E230 series.
Machines based on this engine are the:
Lexmark E230, E232, E330, E332n
IBM InfoPrint 1412, 1412N
Dell 1700, 1700n
One note of very special importance, there was a total recall of
all units sold, regardless of brand before August 20th 2004 for
a shock hazard. This recall was done in cooperation with the U.S.
Consumer product Safety Commission (CPSC) it encompassed 39,431
machines from Lexmark, IBM, and Dell.
If you have one of the machines, go to the manufacturer’s
web site for return/repair information. This is not a recall you
want to ignore; apparently the potential for a shock is there just
by touching the case of the printer.
A link to the CPSC recall is as follows: http://www.cpsc.gov/cpscpub/prerel/prhtml04/04211.html
Recall information is there as well as the web sites and contact
information on each vendor
Recall aside, these are very fast, inexpensive, small machines
that should be very popular.
How to take test prints as well as cleaning the printer are covered
at the end of the article.
-
Lexmark E330 toner 80g for the low yield, 190g for the high
yield
-
Small bottle of Acetone (Available from your local hardware
store)
-
Toner Magnet cloths
-
Lint-free synthetic cotton 4"x 4" pads
-
99% Isopropyl Alcohol
- Cotton Swabs
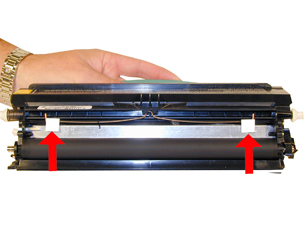
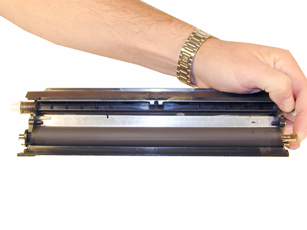
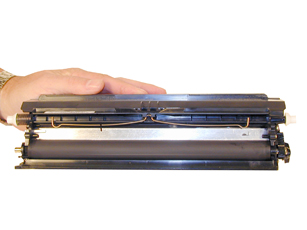
1) Remove the white adhesive tabs that hold the leaf spring in
place. See Figure 1
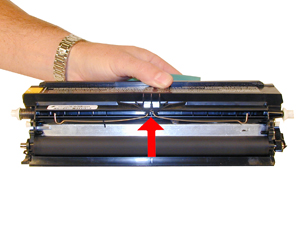
2) Remove the leaf spring. See Figure 2
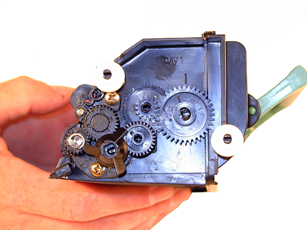
3) On the gear side of the cartridge, remove the propeller styled
drive gear. This gear is on tight, and you may need a small screwdriver
to pry it off. See Figure 3
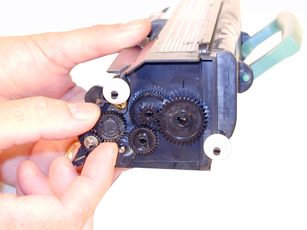
4) Remove the idler gear. See Figure 4
|
|
Figure 1 |
Figure 2 |
| 
|
|
Figure 3 |
Figure 4 |
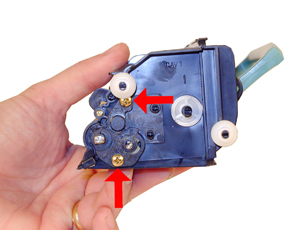
5) Remove the “c” ring from the developer roller shaft
and the developer roller drive gear. See Figure 5
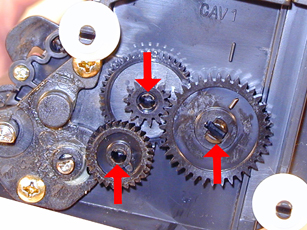
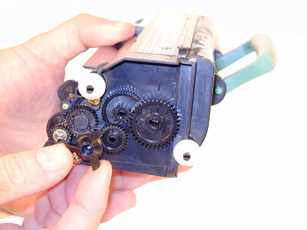
6) Remove the three remaining gears. Press the tabs on the gear
shaft to release the gears. See Figures’ 6 & 7
7) Remove the 2 screws and the axle plate from the cartridge. See
Figure 8
|
|
Figure
5 |
Figure
6 |
|
|
Figure
7 |
Figure
8 |
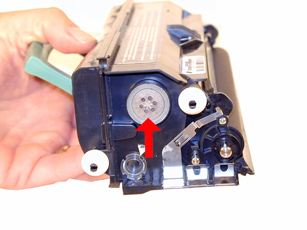
8) Remove the fill plug, and dump out any remaining toner. See
Figure 9
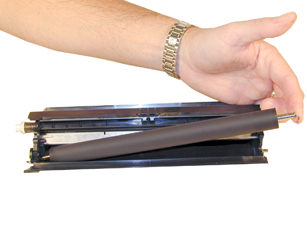
9) Remove the developer roller. Clean the toner feed roller with
compressed air if available. See Figures 10 & 11
10) Clean the Doctor Blade with a cotton swab and a small amount
of acetone. Remove any remaining residue with another cotton swab
and 99% Isopropyl alcohol. See Figure 12.
It is important to clean the blade first with Acetone to get all
the build up off, and the alcohol to remove any residue from the
Acetone left.
|
|
Figure
9 |
Figure
10 |
|
|
|
Figure
11 |
Figure
12 |
11) Wipe the developer roller with a clean lint free cloth, and
re-install the developer roller. At this point we do not recommend
that any chemicals be used to clean this roller. See Figure 13
12) Install the axle plate and two screws. See Figures 14
13) Install all the gears and the “c” ring. See Figure
15
|
|
Figure
13 |
Figure
14 |
|
|
|
Figure
15 |
Figure
16 |
14) Check to make sure the doctor blade seal is intact (clear tape
on top of the blade) and install the leaf spring. See Figures 16
& 17
15) Re-install the two white adhesive tabs back in there proper
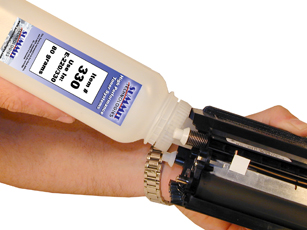
location. See Figure 18
16) Fill the cartridge with the proper amount of E330 toner and
install fill plug. See Figure 19
17) There is a small clear window located under the fill plug.
Make sure this window is clean. It is used to determine toner low.
See Figures 20
|
|
Figure
17 |
Figure
18 |
|
|
|
Figure
19 |
Figure
20 |
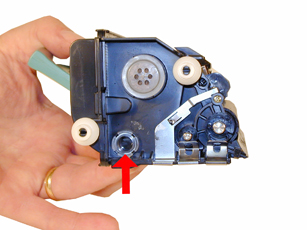
18) Replace the chip. Make sure the chip you have is for the proper
brand. Each brand has its own chip. (Lexmark, IBM, Dell) See Figure
21
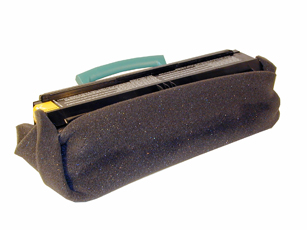
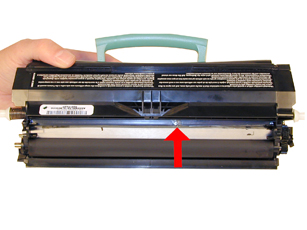
19) If the foam cover is available, wrap the cartridge as indicated.
This foam helps protect the developer roller from damage. Aftermarket
covers are in development. See Figure 22
1) If the machine is installed on a PC, Click on Start-Settings-Printers
2) Select the proper printer
3) Click on File-Properties
4) Click on Print test Page.
To run test pages on a printer with out a PC do the following:
1) Turn off the printer
2) Open the front cover
3) Press and hold the CONTINUE button and turn the printer back
on. All the lights will cycle
4) Close the cover
5) To Print the Configuration page, Press and hold the CONTINUE
button until the lights cycle. The page will print out.
Printing
Test Prints
1) If the machine is installed on a PC, Click on Start-Settings-Printers
2) Select the proper printer
3) Click on File-Properties
4) Click on Print test Page.
To run test pages on a printer with out a PC do the following:
1) Turn off the printer
2) Open the front cover
3) Press and hold the CONTINUE button and turn the printer back
on. All the lights will cycle
4) Close the cover
5) To Print the Configuration page, Press and hold the CONTINUE
button until the lights cycle. The page will print out.
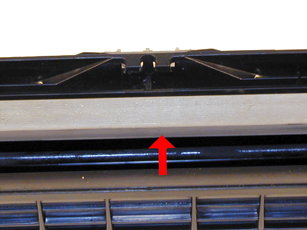
Cleaning the Printhead glass
Open the front cover and remove the toner and
drum cartridges. Locate the glass printhead lens in a recess above
the cartridge bay. Wipe the glass down with a lint free dry cloth.
Do NOT use any type of chemicals on the glass. Re-install the cartridges
and close the cover.
© 2003 Summit Laser Products,
Inc. Any attempt to reproduce any part of these instructions without
the written consent of Summit Laser Products, Inc is prohibited.
All registered trademarks are the property of their respective owners.

|