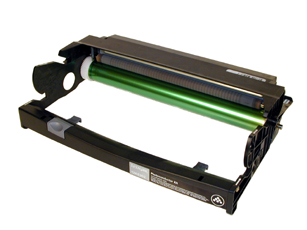
Remanufacturing the Lexmark E230/330/340 OPC Cartridge
0355
The Lexmark E230/330/340 engine has been around for a while. It was first introduced in June 2004. Since then a number of different Lexmark branded toner cartridges have been introduced, but they all use the same drum cartridge, the 12A8302. The difference in the toner cartridges so far has been the chip.
The basic engine is rated for 1200dpi and between 22 and 30ppm, depending on the machine. The street cost for the latest machine (E238) is $149.00* so they continue to grow very popular. The newest machine, the E238 was released in Feb. 2006, (the date of this writing). The only real difference besides the lower cost of the printer is the toner cartridge. There is only a low yield, 2,000 page cartridge, and although we have not seen one yet, it is I think a safe guess that the chip is also different.
The drum units are rated for 30,000 pages. The E238 machine MAY continue to operate until 40,000 pages have been reached. At that time, the printer will stop and no further printing will be allowed until the cartridge is replaced. The word “MAY” is from the Lexmark manual. They do not go into any further detail. The change Photo conductor lights/message will start showing at about the 30,000 page mark. Even though it is possible an OEM drum will last another cycle, especially if it is run the 40,000 pages most likely it will not. We recommend that the drums be replaced.
One interesting note is that the starter cartridge that comes with new machines when empty does not show toner low. Lexmark does not explain it, they just state it.
The machines that use the 12A8302 OPC cartridge are as follows:
Lexmark E232
Lexmark E232t
Lexmark E238
Lexmark E240
Lexmark E240n
Lexmark E240t
Lexmark E330
Lexmark E332n
Lexmark E332tn
Lexmark E340
Lexmark E342n
The list price for the Lexmark OPC cartridge is $86.00*, as simple as these are to do, they well worth the effort. I think in some cases it might be harder to reset the machine than to re-build the cartridge!
* Pricing as of February 2006
-
New Replacement drum
-
New Wiper Blade
-
Cotton Swabs
-
Isopropyl Alcohol
- Drum Padding Powder
-
Phillips head screw driver
-
Small Common screw driver
-
Vacuum approved for toner
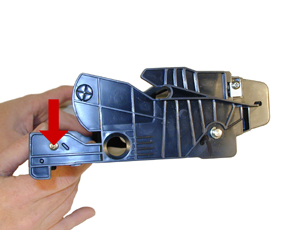
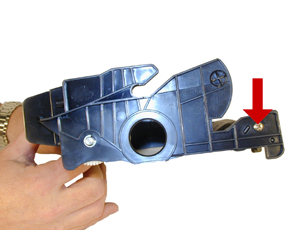
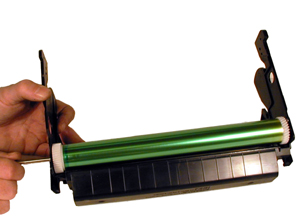
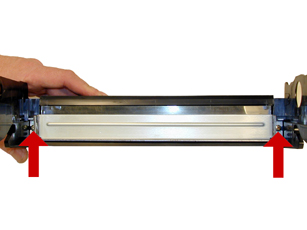
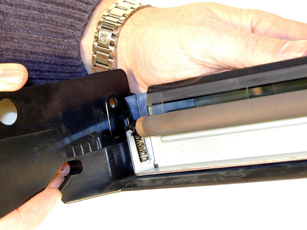
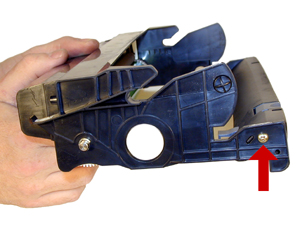
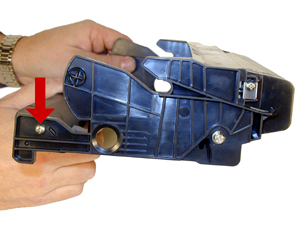
1) Remove the two screws from either side of the handle/cartridge lock See Figures 1 & 2
| 
|
|
Figure 1 |
Figure 2 |
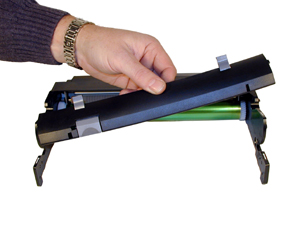
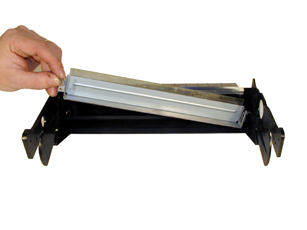
2) Remove the handle/lock. See Figure 3
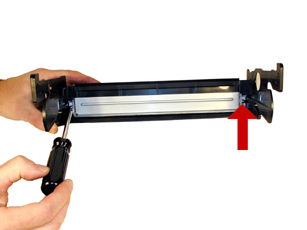
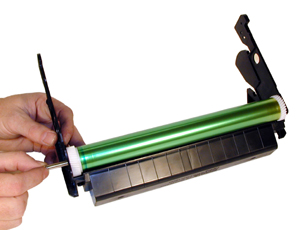
3 Remove the E-ring from the small gear side of the drum axle shaft. See Figure 4
| 
|

|
Figure 3 |
Figure 4 |
4) Remove the drum axle from the large gear side of the drum. If you try to pull it out from the small gear side, the shaft will jam up on the drum ground contact and damage the contact. See Figure 5
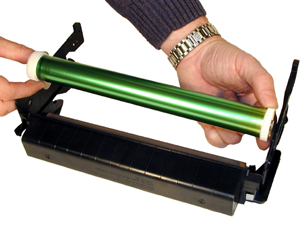
5) Carefully remove the drum. See Figure 6
| 
|

|
Figure 5 |
Figure 6 |
6) Carefully lift out the PCR. The PCR holders will most likely come out with the PCR. This is OK. It makes it easier to re-install it later. Be very careful not to touch the roller with your skin. As with any PCR, the oils naturally present in your skin will be absorbed by the roller and cause printing problems. (Extra marks on the page) See Figure 7
7) Remove the two screws from the wiper blade. See Figure 8
| 
|
|
Figure 7 |
Figure 8 |
8) Remove the wiper blade, and clean out any waste toner. See Figure 9
9) Install a new wiper blade coated with your preferred lubricant and two screws. See Figure 10
| 
|
|
Figure 9 |
Figure 10 |
10) Clean the PCR holders with 99%pure isopropyl alcohol. Snap on to the ends of the PCR.
11) Install the PCR and holders. See Figure 11
12) With the waste chamber facing you, install the drum so that the large gear is on the left side, spring on the small gear facing down. See Figure 12
| 
|
|
Figure 11 |
Figure 12 |
13) Install the drum axle from the large gear side. See Figure 13
14) Install the E-ring on to the axle. See Figure 14
|

|
Figure 13 |
Figure 14 |
15) Install the handle/cartridge lock assembly and 2 screws. See Figures 15 & 16
| 
|
|
Figure 15 |
Figure 16 |
16) Just to make sure that everything is meshing properly and lubricated properly, rotate the drum by the large gear in the proper direction. This is always a good idea for drum units as a final check before installing the cartridge in your test machine.
Reset Procedure(s)
Resetting the Lexmark E340/342 (display type) machines
1) Turn the printer off
2) While still off, press and hold the SELECT and RETURN buttons.
3) Keep both buttons pressed, and turn the printer on. Continue to hold both until either “Performing self test” or “Config menu” appears on the display.
4) Release the two buttons
5) RESET PC CNT should now show on the display. If it does not, press the left or right menu buttons until it does.
6) Press the SELECT button once. “Resetting PC Cnt Value” should show on the display.
7) When the display shows CONFIG MENU again, turn the printer off.
8) Turn the printer back on. (Do not hold any buttons down this time). The printer is reset.
You can confirm the counter was reset by printing a “menu settings page”.
Resetting the Lexmark E230/232/234/238/240/330/332 machines (Non-Display)
1) With the printer on and the “ready” light on, open the front cover
2) Press and hold the “CANCEL” button until all of the lights begin flashing up and down.
3) Release the “CANCEL” button and close the door. The printer is reset!
You can confirm the counter was reset by printing a “menu settings page”.
Printing the “Menu Settings page”
E340/342
1) With the printer ready, press the left or right menu buttons until UTILITIES MENU appears on the screen.
2) With UTILITIES MENU on the display, press the SELECT button once.
3) Print menus should appear on the display. If this is not on the display, press the left or right menu buttons until it is.
4) Press the SELECT button. The menu page should print.
On the test page, look under CARTRIDGE INFORMATION for PHOTOCONDUCTOR. It should say OK or close to 100% If it does not, run approximately 20 pages and run this page again.
E230/232/234/238/240/330/332 (Easy way)
1) With the printer ready, press the CONTINUE button once. The ready light will flash, and 2 pages will print out.
On the test page, look under CARTRIDGE INFORMATION for PHOTOCONDUCTOR. It should say OK or close to 100% If it does not, run approximately 20 pages and run this page again.
If this procedure did not work, the counter must be reset using the printers Configuration Menu. This is done by the following:
E230/232/234/238/240/330/332 (Hard Way)
1) Turn off the printer
2) Open the front cover.
3) Press and hold the CONTINUE button. Turn the printer on.
4) Hold the CONTINUE button down until all the lights cycle.
5) Just when the ERROR light (!) is displayed, close the front cover. The top four lights of the operator panel should come on indication the printer is in the configuration mode.
6) Print out the configuration settings page by pressing and holding the CONTINUE button until all the pages flash. The page will print. Save for possible use later.
7) Press and release the CANCEL button to move from one menu item to another. NOTE: If you get lost, press and hold the CANCEL button to jump back to the home state (top 4 lights on).
8) Press and release the CANCEL button until the “Toner Low” light is the only light left on.
9) Press and hold the CONTINUE button until all of the lights flash. Release the button.
10) When the “Toner Low” light is again the only light left on, the photoconductor page count is reset to zero.
11) Turn the printer off for 5 seconds, and turn back on. This will return the printer back to a normal state.
12) Print the “Menu settings” page as indicated above.
The E340 models have a display and the error messages are fairly straight forward. The non-display models however use light sequences. We will list some of the more common here.
Error light ON; Door open
Continue light ON, load paper On; paper empty or mis-feed
Toner low/Replace PC kit light ON; Press the continue button to print the Menu Settings page to see which cartridge is near the end of it’s life. Press and hold the CANCEL button to reset the printer.
Continue light ON, Toner low/Replace PC kit light ON; Photoconductor near the 30,000 page mark or full
Toner low/Replace PC kit light BLINKING; Replace the drum unit
Toner low/Replace PC kit light BLINKING, Error light BLINKING, Continue light ON; Printer stopped. Replace drum unit
Toner low/Replace PC kit light ON, Error light ON; Missing toner cartridge or toner cartridge error
Toner low/Replace PC kit light ON, Error light BLINKING ; Invalid toner cartridge. (Wrong brand()
Toner low/Replace PC kit light ON, Error light ON; Toner cartridge region mismatch.
Toner low/Replace PC kit light ON, Error Light ON; Toner cartridge chip problem.
Toner low/Replace PC kit light ON, Error Light BLINKING; Toner cartridge has a used chip, and has been refilled. Replace with a new un-used chip
Cartridge Defect Chart
Developer Roller (Toner cartridge) 54mm
OPC Drum (Drum cartridge) 94mm
PCR (Drum Cartridge) 38mm

|