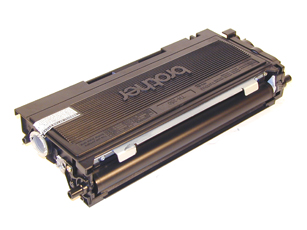
Remanufacturing
the Brother HL 2030 Toner Cartridges
0361
Released in January 2005,
the Brother HL-2030 printer engine is based on a new 20ppm, 1200
DPI laser engine. While it is similar to previous Brother engines,
there are differences. Beside physically looking different, the
toner is also new. The first section of this article covers the
theory behind these cartridges. If you are already familiar with
the pitfalls of the HL-1240 cartridges, there is nothing new in
the theory here. If you are not however, it would be best to read
through this section. It may save you a few very frustrating hours.
At this point, there are not many machines released, but I’m
sure more will follow. With a street price of $137.00 for the HL-2040,
they are fast becoming very popular.
HL-2030
HL-2040
HL-2070N
So far, Brother has only released one cartridge for these machines,
the TN-350. The TN-350 cartridge is rated for 2,500 pages at 5%.
The drum unit is new as well, Part # DR-350 (DR-2000 Europe). It
will be covered in a future article.
One change for these cartridges is the presence of a flag gear
that resets the printer. The starter cartridges that come with new
printers do not have this gear. We are working on new flag gears,
but until they become available, the starter cartridges cannot be
remanufactured.
As with previous Brother cartridges, the waste toner is repelled
out of the drum cartridge and picked up by the developer roller
in the toner cartridge and brought back into supply chamber. That
is why there will always be a good amount of toner left in the supply
chamber when the cartridge is finished. This remaining toner MUST
be completely removed from the supply chamber before adding new
toner. Failure to do this will cause back grounding. In addition
to contaminating the toner cartridge, this will also contaminate
the cleaning section of the drum cartridge, which in turn will contaminate
the toner cartridge again. The reasons for this are explained in
the following cartridge theory section.
The cleaning section of the drum cartridge consists of a "cleaning
brush" and a recovery blade. The cleaning brush has two opposite
charges placed on it during the print cycle. The first attracts
any remaining toner off the drum. The second repels the toner off
the brush back onto the drum where it then transfers back into the
toner cartridge. This is all done in a timing sequence that does
not interfere with the printing process. If the cleaning brush becomes
contaminated with bad toner that will not charge, the brush will
not be able to clean itself, and back grounding will occur. It seems
to be the nature of contaminated toner that it will accept most
of the charge to be cleaned off the drum, but it will not accept
the charge that would allow the brush to clean itself off at all.
A properly working cleaning brush will at any given time have only
a small amount of toner on it. Once contaminated, toner will accumulate,
which will only cause the problems to get worse.
Since the developer roller actually contacts the drum, some toner
is transferred back into the supply of the toner cartridge. Once
you print with a bad toner cartridge, the drum unit will become
contaminated. Even when you change out the toner with a good properly
recycled or new OEM cartridge, the drum unit will transfer some
of the bad toner back into the good toner cartridge, which will
again cause back grounding. Both cartridges will be contaminated
again.
The remaining "toner" in the toner cartridge is just
below the bare minimum that can maintain the proper charge level.
When the change toner light comes on, the toner will not charge
up to the proper level and will cause the back grounding. As the
toner cartridge reaches the end of it's useful life, the printer
senses the low charge level in the toner supply and will try to
keep the charge level up. This constant charging keeps an almost
"empty" cartridge from back grounding. Once the printer
cannot get the remaining toner up to the minimum charge, the change
toner light comes on. The cartridge at this point will still be
printing properly. If you were to take that same cartridge out of
the machine for a few days, and then put it back in the printer
with out doing anything to it, the cartridge will shade. This will
happen because the charge level that the printer was trying so hard
to keep up has dissipated out and the materials left can no longer
accept a proper charge.
What does this all mean?
1) Make sure that your cartridge technicians thoroughly clean out
the supply chamber of the toner cartridge.
2) In the event that they forget, and you have a shading cartridge.
The toner must be completely cleaned out again. (Do not use the
toner over!!), and NEW fresh toner MUST be installed.
3) The drum unit has to be taken apart and cleaned out with emphasis
on the cleaning brush area. This is a very simple process but very
necessary once contaminated.
How to run test pages, Printer trouble shooting as well as common
cartridge problems will be covered at the end of this article.
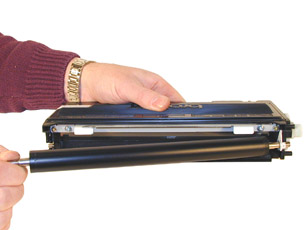
1) Vacuum the exterior of the cartridge.
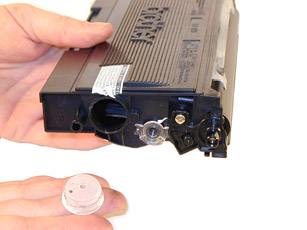
2) Remove the fill plug from the toner cartridge. Dump the remaining
toner and vacuum/blow out the cartridge. Make sure that the gear
area is clean. Leaving any toner in the teeth of the gears may cause
a tooth to be damaged and cause a clicking noise. We have found
it best to use compressed air to clean them out, but to also keep
one hand over the gears to protect them. See Figure 1
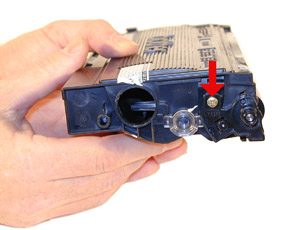
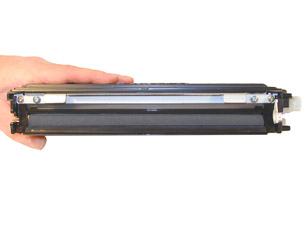
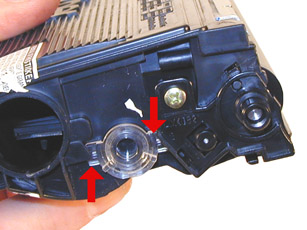
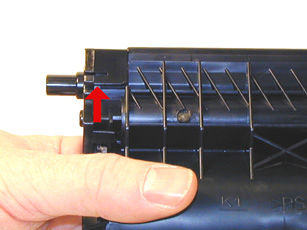
3) On the NON GEAR side of the developer roller, remove the screw.
See Figure 2
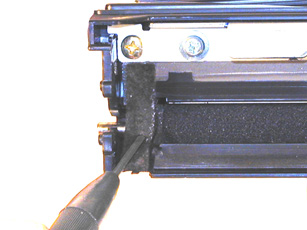
4) Locate the two tabs on the developer roller end plate and pry
off. See Figures 3 & 4
|
|
Figure 1 |
Figure 2 |
| 
|
|
Figure 3 |
Figure 4 |
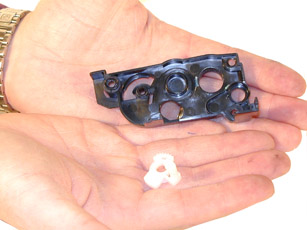
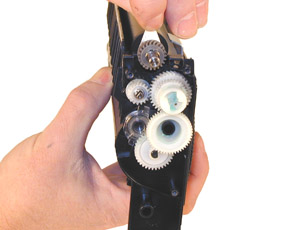
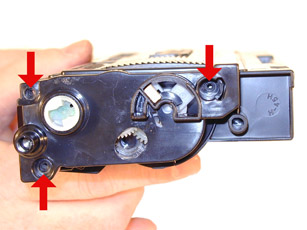
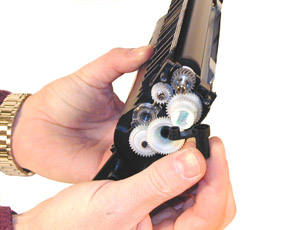
5) On the GEAR SIDE, remove the three screws and cover plate. See
Figure 5
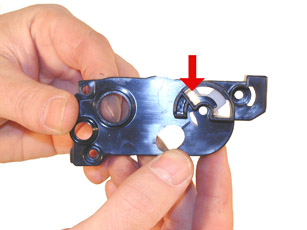
6) A white flag gear will fall off as the plate is removed. This
flag resets the printer when the cartridge is installed. New starter
cartridges do not have this flag gear. Until they are available,
the starter cartridges cannot be remanufactured. See Figure 6
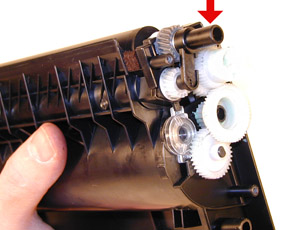
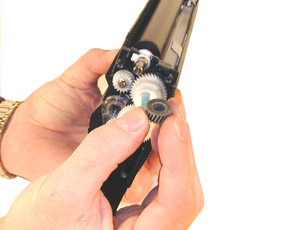
7) Remove the black plastic spacer from the developer roller shaft.
See Figure 7
8) Remove the E-Ring, and small gear. See Figure 8
|
|
Figure
5 |
Figure
6 |
 |
 |
Figure
7 |
Figure 8 |
9) Remove the developer roller. See Figure 9
10) Vacuum the doctor blade and foam feed roller clean. We do not
recommend that the doctor blade be removed and the developer roller
felt seals will be disturbed. Once a new blade is available, great
care will have to be taken not to tear the seals, causing a leak.
The doctor blade can be easily cleaned by blowing the excess toner
off, and wiping down with a lint free cloth. Be very careful not
to leave any lint behind! See Figure 10
11) Inspect the magnetic roller felts. If they are compressed, (shiny)
rough them up with a small screwdriver.
See Figure 11
11) Clean the gears, making sure that they have no toner on them.
This is a good time to also check the gear shafts to make sure there
is enough grease. If the shafts appear dry, or the grease is contaminated
with toner, clean the shaft and inside of the gear. Replace the
grease with white lithium grease. See Figure 12
|
|
Figure
9 |
Figure
10 |
|
|
|
Figure
11 |
Figure
12 |
12) Clean the developer roller with a lint free
cloth. Do not use any chemicals other than a dedicated cleaner for
Brother rollers to clean the roller. A dry clean cloth will work
fine. See Figure 13
13) Re-install the developer roller long shaft side to the gear
side. See Figure 14
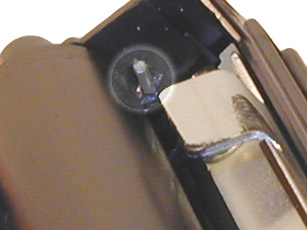
14) Install the small outside end plate and screw on the non-gear
side. Make sure the clear plastic plug for the optical sensor is
locked in the proper position. See Figure's 15 & 16
|
|
Figure
13 |
Figure
14 |
|
|
|
Figure
15 |
Figure
16 |
15) Install the developer roller gear, c-ring, and black axle.
Make sure all the other gears are meshing properly. You may have
to release the white spacer on the mag shaft to get the gear back
on. See Figure’s 17, 18, & 19
|
|
Figure
17 |
Figure
18 |
|
|
|
Figure
19 |
|
16) Set the3 flag gear, install the gear cover plate, and three
screws. See Figures 20 & 21
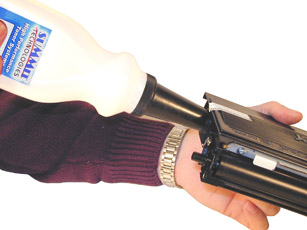
17) Fill the cartridge with Brother 2030 Black Toner See Figure
22
18) Replace the fill plug. See Figure 23
19) Wipe the cartridge down to remove any remaining toner dust.
|
|
Figure
20 |
Figure
21 |
|
|
|
Figure
22 |
Figure
23 |
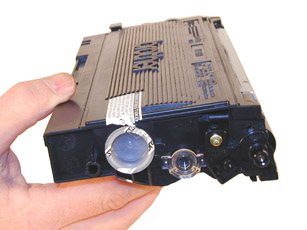
20) Install the developer roller cover. See Figure 24
 |
Figure 24 |
To print a test page from these machines, first turn the machine
off.
Press and hold the “GO” Button, and turn the printer
back on.
All the LED’s will light up, and go off.
When the TONER LED comes on, release the “GO” button.
Press the “GO” Button again; the printer will print
out the test page.
This can also be accomplished through the printer driver.
These machines have 4 LED’s to indicate
the status or various problems. We have listed some of the more
common ones here:
Yellow Toner light blinking, Green READY Light on: Toner Low
Yellow Toner light On, READY light out: Toner out
Yellow Drum light blinking, Green READY Light on: Drum life over
soon
All lights blinking: Service call needed.
When the GO button is pressed, a secondary set of errors will show.
TONER Yellow light on: Fuser error
DRUM Yellow light on: Laser error
TONER Yellow and PAPER Red lights on: Main Motor failure
PAPER Red light on: Engine PCB failure
Common Toner Cartridge Problems
As some problems can be caused by both the toner cartridge as well
as the drum cartridge, we have listed both here.
Back-grounding: Toner cartridge and Drum cartridge; By far the most
common problem with these cartridges, there are three major common
causes.
1) The first is contaminated toner. If the old toner in the toner
cartridge was not fully cleaned out, a shaded background will result
usually over the entire page. This can also be caused by a contaminated
cleaning brush in the drum cartridge, which is directly related
to a bad toner cartridge. (See cartridge theory at the beginning
of this article).
2) If the developer roller in the toner cartridge is worn, it will
tend to pull too much toner, and back-grounding will result. This
normally happens only on cartridges that have been recycled a few
times. A normal roller will have a somewhat mottled look, and the
texture should be smooth. If the roller has lines, small cracks,
or just doesn’t look right, don’t use it.
A dirty developer roller can also cause this. If the roller has
a white or bluish coating, it must be cleaned. Be sure to use only
a dedicated Brother developer roller cleaner. Any other type of
cleaner will probably react with the toner and cause another set
of problems.
3) Another back-grounding issue can result from the toner being
used. Not all aftermarket toners will work together. This is because
there is always a small amount of toner left on the drum cartridge
cleaning brush. Most aftermarket toners will work over the OEM,
but not all will work over another aftermarket toner. If your cartridges
work in house but background out in the field, it can be that the
drum unit has failed, or that another aftermarket toner was used
previous to yours. Check with your vendor to make sure that your
toner will work on top of another (all) aftermarket brand(s).
Dark Black Vertical Streaks: Drum cartridge; This is normally caused
by either a dirty primary corona wire, or the blue corona wire cleaner
is not in its "home" position on the left side of the
cartridge.
Gray Vertical Streaks: This is normally caused by a groove in the
developer roller. If the roller has a groove worn in it, it must
be either replaced, or re-surfaced by a company that specializes
in this.
Light Print: Drum cartridge; Can be caused by a dirty or worn Transfer
Roller. These rollers are located inside the cartridge. In our tests,
they should last at least 2 cycles.
Black or white horizontal Lines: Toner cartridge and Drum cartridge;
Black lines normally appear when there is a build up of toner, White
when there is a dead spot, or contamination of the roller.
Solid Black Pages: Drum cartridge; Bad drum ground contact, probably
from the drum axle shaft to the contact gear inside the drum.
Perfectly straight thin black lines down the page: Drum cartridge;
Scratched drum.
Black dots that repeat 4x/page: Drum cartridge; Bad drum, or something
is stuck to the drum surface.

|